Discover how to build a durable and comfortable Diy Outdoor Cat House to protect stray or feral cats from the elements. This step-by-step guide provides all you need to create a safe haven for your feline friends, ensuring they stay warm and dry throughout the year.
It all started about two years ago when a feral female cat began appearing in our backyard. Like many animal lovers, we couldn’t resist offering her food. Soon enough, our consistent food source made our place her regular haunt. Around six months into her visits, it became clear she was pregnant, and shortly after, she introduced us to three adorable kittens. We managed to safely trap the mother and her kittens. After weaning, the kittens became our indoor pets. However, the mother cat, being feral and naturally wary of humans, was released back outside after her recovery, as she was much happier in her outdoor domain. This experience led me to realize that if she was going to continue living around our home, she needed proper protection from the weather. Living in southern North Carolina, our winters are mild, but we still experience occasional light snow and temperatures that can dip into the teens. That’s when I decided to build her a dedicated outdoor cat house, a warm and dry refuge from the elements.
Seeking inspiration, I explored online resources for outdoor cat houses and came across a design that sparked my creativity: a double-decker style shelter.
 Inspiration for a double-decker outdoor cat house
I was particularly drawn to the double-decker design because it offered both an enclosed housing area and a sheltered space underneath. This under-deck area seemed perfect for placing food and water bowls, protecting them from rain and keeping the water source separate from the sleeping area, preventing accidental spills from dampening her bedding.
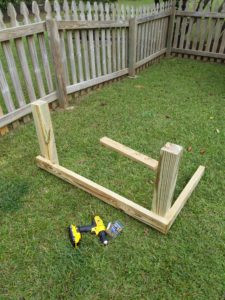
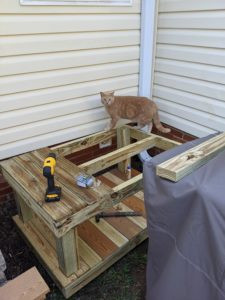
My planning process began by carefully studying the image and assessing the space in my yard where I intended to place the shelter. I determined the desired dimensions, performed some basic calculations to estimate the necessary lumber, and then started building. I was fortunate to have scrap wood for much of the base and top platform. I only needed to purchase 4×4 posts for the corners and 2x4s for support between the posts.
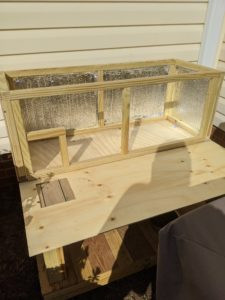
 Building the frame of the outdoor cat house
Ensuring the structure was level was a priority. I attached the 2x4s to the posts using Power Pro screws. I prefer these screws because pre-drilling isn’t required, and their star head design provides superior grip, reducing stripping. I opted for screws over nails for their ease of use and the ability to disassemble the structure later if relocation becomes necessary.
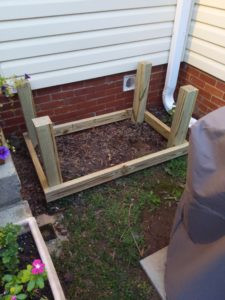
Once the frame was complete, cutting the wood for the platforms was straightforward. I intentionally left small gaps between the boards to accommodate natural expansion and contraction due to weather changes.
 Building the platforms for the cat house
 Adding platform boards to the cat shelter frame
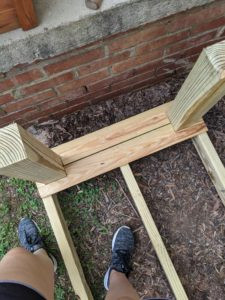
For added strength, I incorporated an extra 2×4 support in the middle of the top platform. While it might have been slightly over-engineered, I wanted to ensure maximum sturdiness.
 Adding central support to the top platform
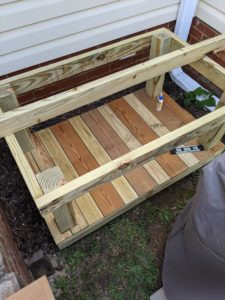
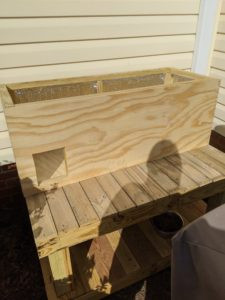
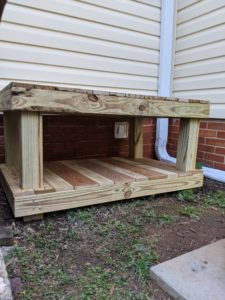 Completed platforms for the DIY cat house
 View of the platform from underneath, showing the frame
With the platforms finished, the project paused temporarily. Building the enclosed house section felt daunting, and I was also juggling another home renovation project – refinishing our upstairs guest bedroom floors. Like many DIY enthusiasts, I often have multiple projects underway simultaneously. Eventually, I returned to the cat house project and began constructing the actual shelter. I decided to make the house span the entire length of the top platform but only half its width, creating a generously sized interior. I started with a plywood base to prevent drafts from rising through the platform gaps, ensuring a warmer interior. Once the plywood was secured, I began framing the walls. Using 2x2s and screws, I attached the wood pieces. This stage was relatively straightforward; I measured the plywood base and estimated the desired wall height.
 Building the frame for the cat house walls
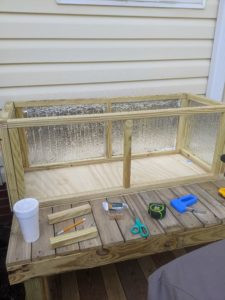
Each wall was screwed to the plywood base and then interconnected for added stability. After framing the walls, I sheathed the exterior with plywood and then stapled insulation to the plywood. I chose reflective insulation for its non-itchy properties and its potential to reflect the cat’s body heat back into the shelter, enhancing warmth. It was also remarkably easy to cut to size with just scissors. After assembling the two sides and back walls, I cut a piece of plywood for the front, incorporating a cat-sized entrance hole. The hole is large enough for a cat to comfortably enter but small enough to deter larger animals like raccoons.
 Adding insulation to the walls of the cat house
 Front wall with cat entrance hole cut out
Next came the roof construction, which proved to be the most challenging aspect. I wanted a sloped roof to prevent water accumulation and potential structural damage. I also envisioned a house-like aesthetic, which a slanted roof would provide. Honestly, this part was the trickiest, involving numerous errors before achieving the correct angles. I enlisted my husband’s help with the geometry calculations, as math, especially geometry, isn’t my forte. With his assistance, determining the correct angles became manageable. I placed a plywood sheet on top to enclose the house, keeping the interior space compact enough for a cat’s body heat to effectively warm it. Then, I screwed the roof framing pieces, also made from 2x2s, onto the plywood and interconnected them.
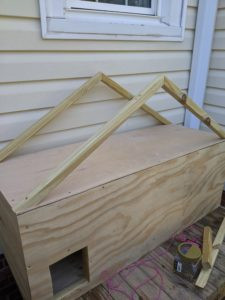 Framing the slanted roof of the cat house
Once the frame was in place, it was simply a matter of adding plywood sheathing and then cedar shingles to enhance its appearance and provide a proper roof finish.
 Adding plywood sheathing to the roof frame
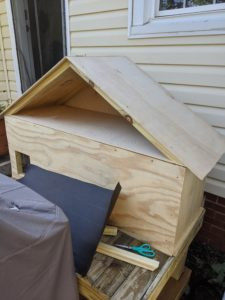
 Cedar shingles added to the cat house roof
At this stage, I decided to add some finishing touches. Using leftover outdoor paint from previous shed projects, I painted the house section to give it a brighter look. For the rest of the structure, I applied an outdoor stain I had on hand to protect the wood from the elements.
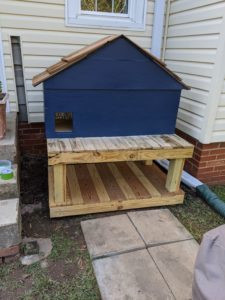 Painting the cat house and staining the platform
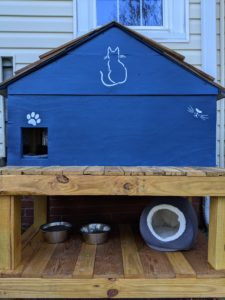
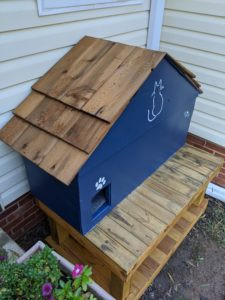
Finally, to personalize it and make it more inviting, I added decorative elements: a painted cat silhouette, whiskers, and a paw print in white paint.
 Decorative paint touches added to the DIY cat house
Overall, I am extremely happy with the final result and learned a great deal throughout the building process. I’ve included links to some of the materials I used in this post. If you have any specific questions or need more details, please feel free to ask in the comments below!
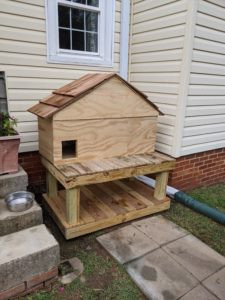
 Finished DIY outdoor cat house in backyard