
Cats, with their captivating charm and playful antics, have long been beloved companions and muses. It’s no wonder many aspiring artists are drawn to capture their feline features on paper. If you’re eager to learn Cat Face Drawing and create your own adorable kitty portraits, you’ve come to the purr-fect place!
This tutorial will guide you through the process of sketching a cat face that looks both genuine and engaging. While cats are known for their soft fur, understanding their underlying anatomy is key to a believable drawing. Don’t worry, we’ll break down cat face drawing into manageable steps, focusing on shapes and proportions to help you create a charming feline face.
Let’s embark on this artistic adventure and discover how to draw a captivating cat face!
Getting Ready to Draw Your Cat Face
Before you put pencil to paper (or stylus to tablet!), let’s lay the groundwork for a successful cat face drawing. The secret lies in understanding the basic shapes and proportions. Spend some time observing cat photos and even anatomical diagrams of cat skeletons. This will help you grasp the structure beneath the fur. Pay close attention to how the features are positioned on a cat’s face – the spacing of the eyes, the placement of the nose and ears, and the overall proportions.
Consider lightly sketching grid lines as a guide to position the eyes, nose, and ears. These guidelines are like training wheels – they help you maintain proportions and can be easily erased later.
A quick online search for “how to draw a cat face” will reveal a vast array of styles, from simplistic cartoons to hyper-realistic renderings. This guide is specifically designed for beginners who want to learn how to draw a cat face that is endearing yet has a touch of seriousness. We’ll build our kitty using fundamental shapes, making it easy to follow along, and leaving room for you to personalize your drawing with colors and details later on.
Essential Tools for Cat Face Drawing
Having the right tools can significantly enhance your drawing experience. For creating a digital cat face drawing, a drawing tablet, a stylus, and drawing software are ideal. However, you can also achieve fantastic results with traditional tools like pencils, erasers, and paper. Choose the medium you feel most comfortable with to begin your artistic journey.
Step-by-Step Painted Stylized Cat Face Drawing Guide
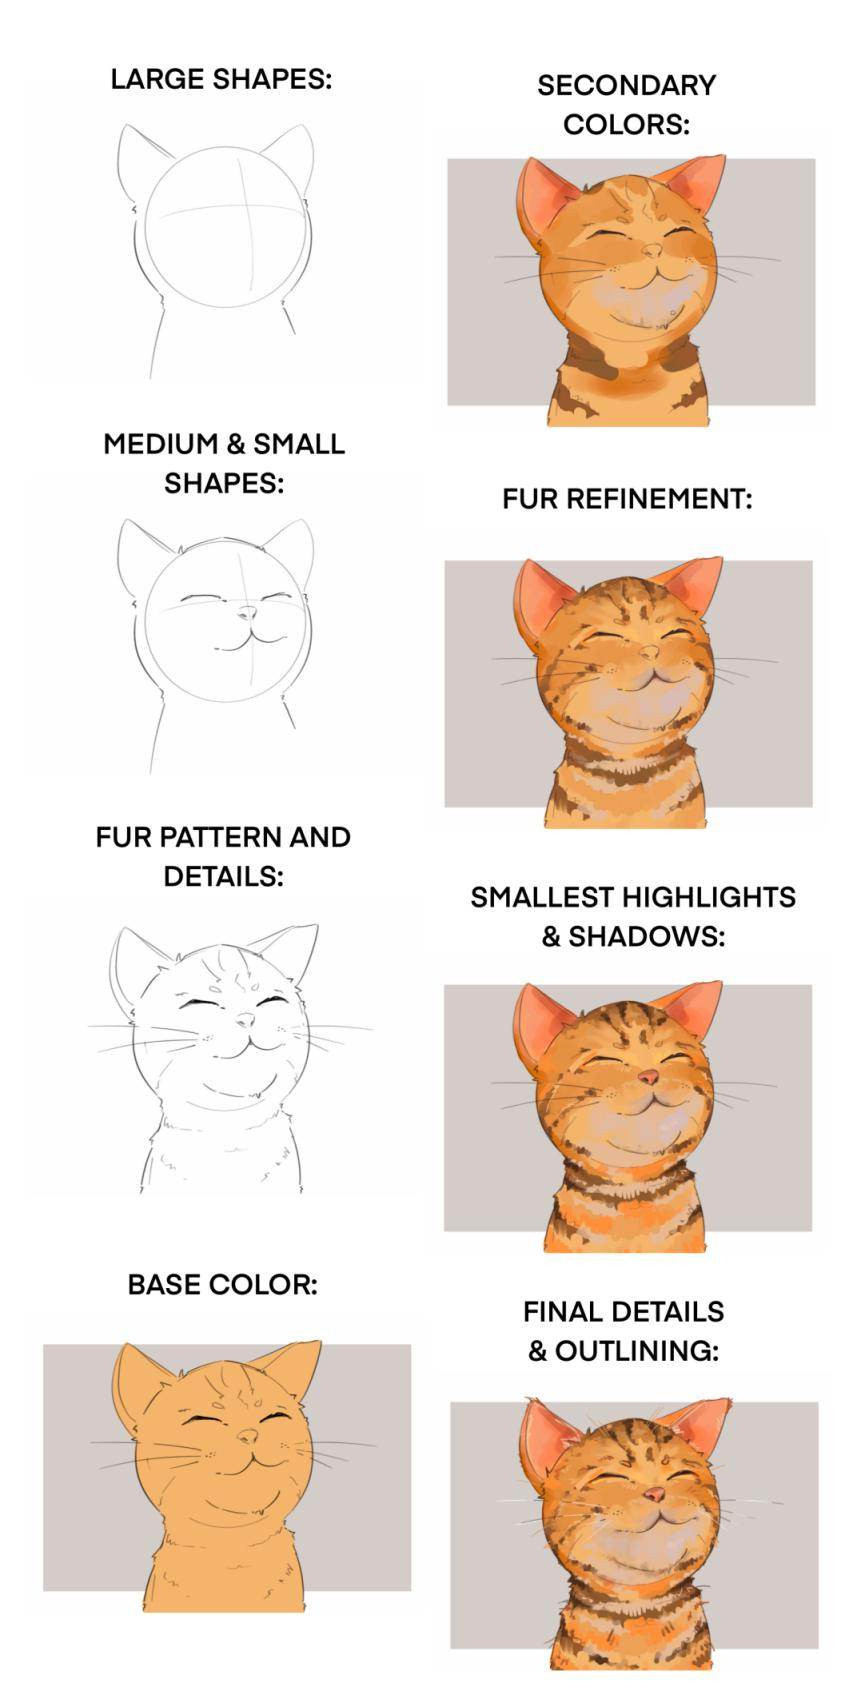 Stylized cat face drawing guide using basic shapes
Let’s dive into the step-by-step process of creating a stylized cat face drawing. We’ll break it down into manageable stages, starting with basic shapes and gradually adding details.
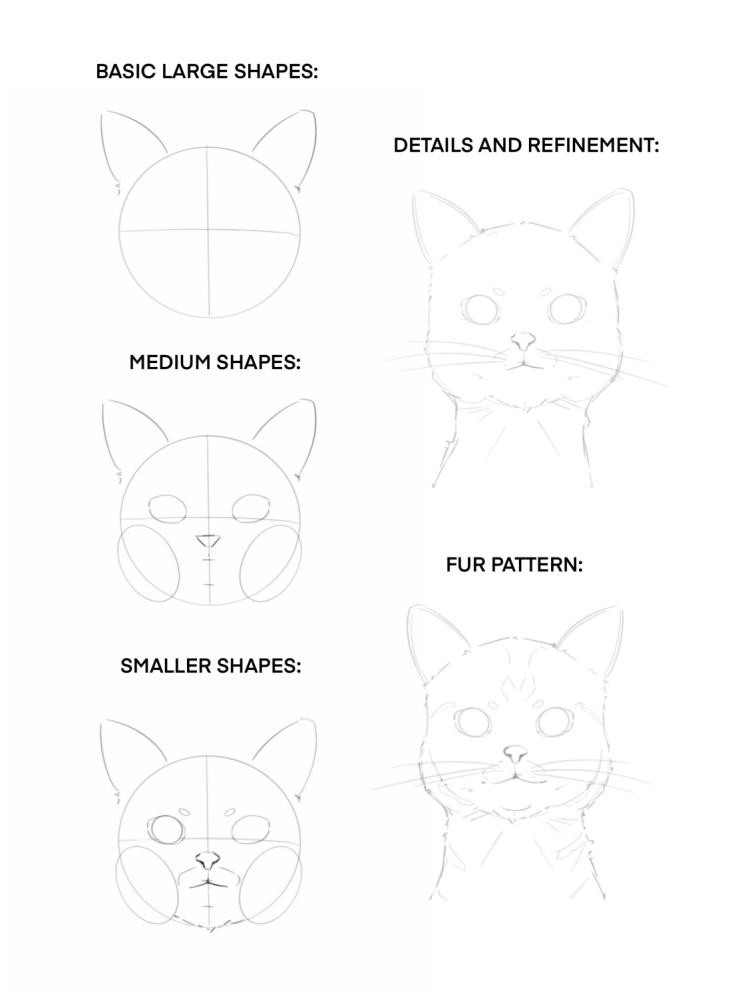
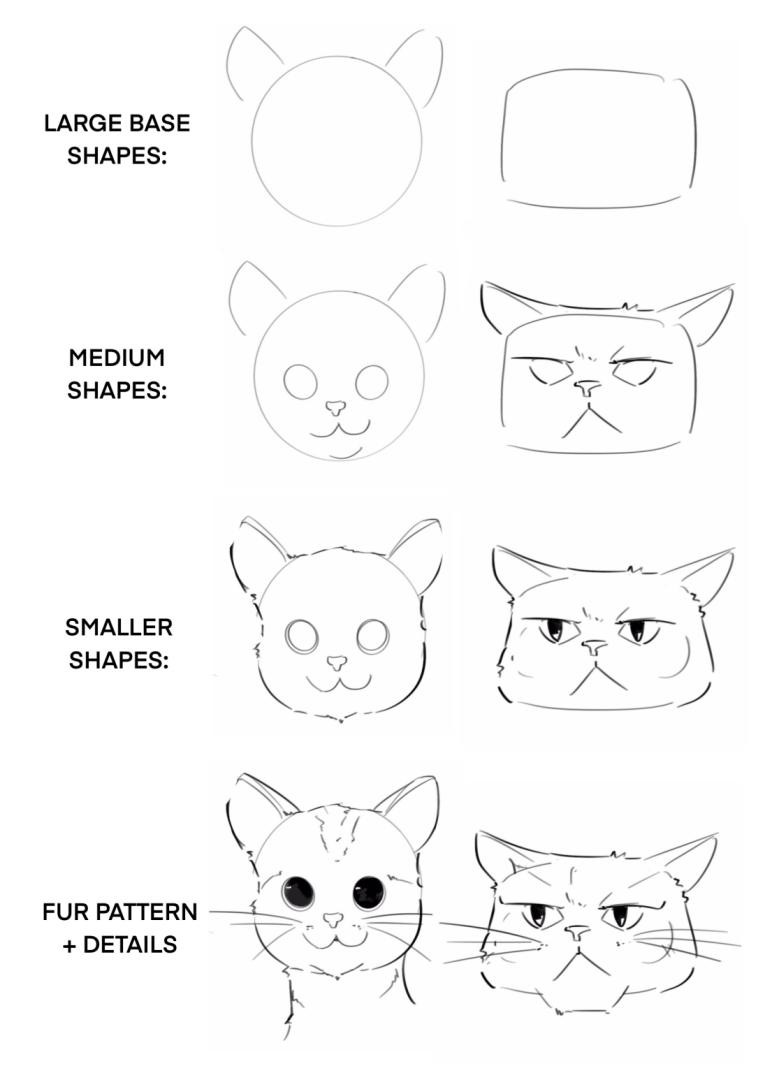
1. Laying the Foundation with Basic Shapes
How to start a cute cat face drawing? We begin by sketching fundamental shapes. This initial step is crucial for ensuring accurate proportions. Think of it as building a framework for your drawing. Before adding details, it’s always best to simplify the subject into its most basic forms.
In our cat face drawing, we’ll start with a large circle for the head and triangles for the ears. When sketching these outlines, use light, gentle strokes. Applying too much pressure early on can make erasing difficult and might lead to unwanted lines in your final artwork.
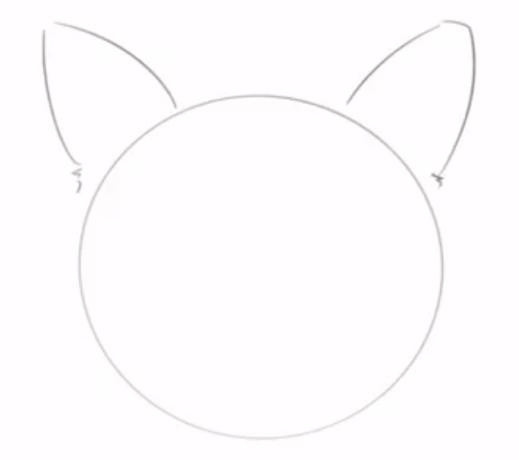 Basic shapes for cat face drawing
2. Refining Shapes with Organic Lines
Cats possess incredibly expressive ears, vital for their keen hearing. When drawing the cat’s ears, remember they aren’t perfect, rigid triangles. Similarly, the head circle can be slightly adjusted into a softer oval shape. Often, beginner artists tend to make shapes too stiff, which can make a drawing look less natural. For a more realistic cat face drawing, incorporate organic, slightly curved lines instead of strictly straight ones.
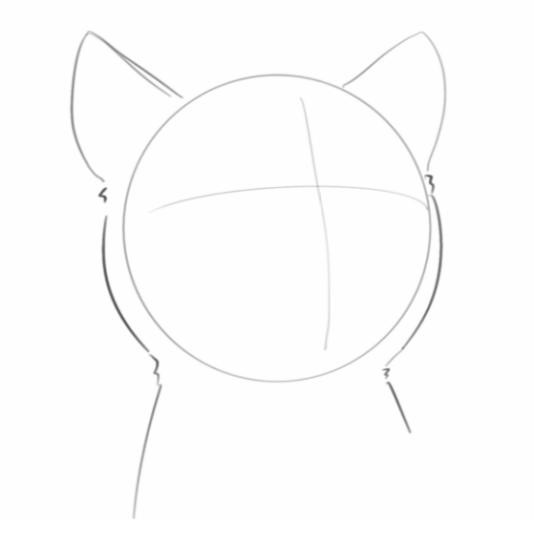 Organic shapes for a cat face drawing, refining the initial basic shapes
3. Introducing Medium Shapes for Definition
In the previous step, we subtly defined the snout, cheeks, and brow ridges. Now, we’ll introduce medium shapes to further refine these areas and break down the larger forms. Adding these medium shapes is key to giving your cat face drawing more definition and character. These shapes begin to suggest the distinct features that make a cat recognizable.
 Medium shapes added to define facial features in cat face drawing
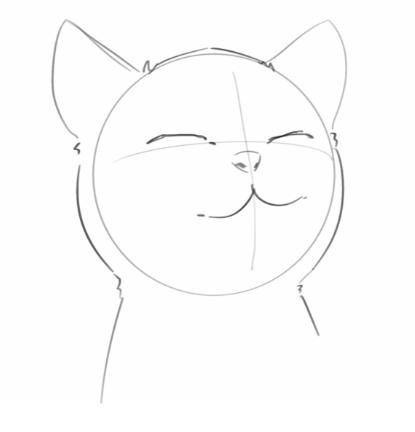
4. Adding Smaller Shapes: Eyes, Nose, and Whiskers
This is where the magic happens! We’ll now focus on the smaller details that bring your cat face drawing to life: the eyes, nostrils, whiskers, and mouth. A simple approach for the eyes is to start with two circles. For the nose, a triangle shape works well. The mouth can be depicted as a soft, wider, reversed “m” shape.
Did you know a cat typically has around 24 whiskers, 12 on each side? These amazing sensory organs act like radars, helping cats maintain balance and perceive changes in their environment. For your drawing, you don’t need to draw all 24 whiskers! Three or four well-placed whiskers on each side will suffice. Use light, relaxed strokes when drawing whiskers, barely applying pressure with your pencil or stylus.
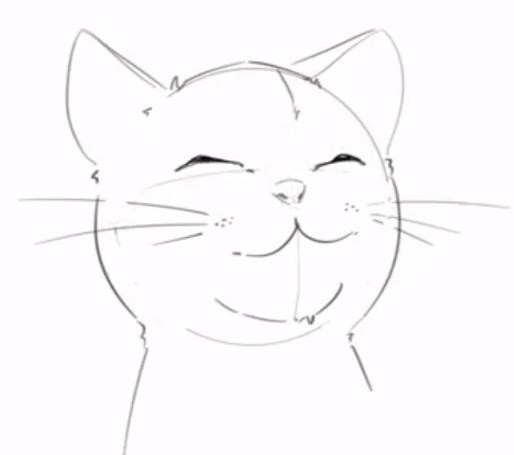 Smaller details like eyes, nose and whiskers added to the cat face drawing
5. Incorporating Patterns and Fur Details
With all the essential facial features in place, we can start adding cat patterns and fur details. Introduce subtle lines and variations within the shapes to suggest fur volume. These details add a touch of randomness, making your cat face drawing appear more natural and lifelike. Consider the direction of the fur growth as you add these strokes.
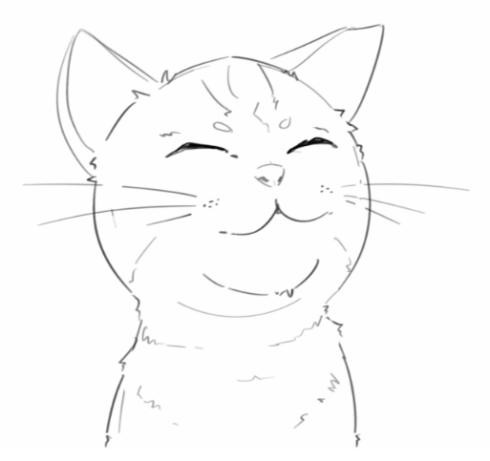 Patterns and fur details being added to enhance the cat face drawing
6. Applying Base Colors and Rendering Fur
The next step in creating a realistic cat face drawing is to introduce base colors. Begin by filling in the larger areas with your chosen colors.
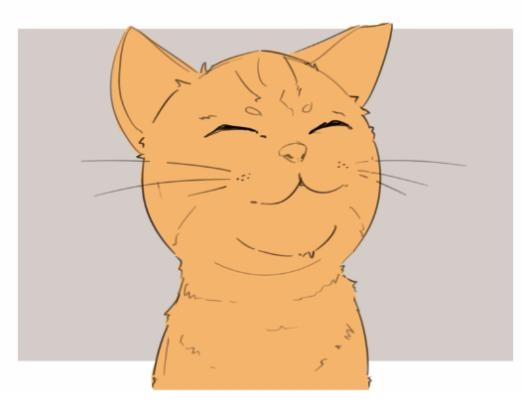 Base colors being applied to the cat face drawing
Next, build upon these base colors by adding layers and variations.
 Further coloring added to the cat face drawing to create depth
When rendering fur, remember to apply brushstrokes in the direction of the fur growth. Mix soft edges with sharper edges to create a more realistic texture and visual interest in your composition. You don’t need to render every single strand of fur; focusing on texture in key areas can be very effective.
 Brushstrokes applied in the direction of fur growth for realistic rendering in cat face drawing
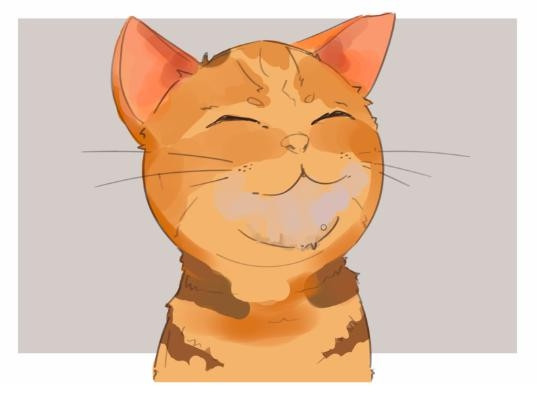
7. Adding Subtle Highlights and Shadows
To add depth and volume to your cat face drawing, carefully incorporate highlights and shadows. Strategically place highlights on areas where light would naturally hit, and shadows in areas that would be recessed. Subtle color variations within these highlights and shadows can further enhance the three-dimensional effect.
 Highlights and shadows added to give volume and depth to the cat face drawing
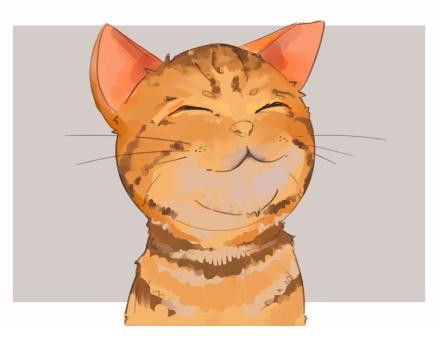
Exploring Realistic Cat Face Drawings
 Realistic cat face drawing example
For a realistic cat face drawing, focus on capturing the nuances of feline anatomy. Outline the cat’s face using a combination of curves and straighter lines to reflect the bone structure beneath the fur. Adding fur detail with short, fine strokes around the outline is crucial for achieving a realistic texture. Even without full coloring, careful line work and attention to detail can result in a compellingly realistic cat face.
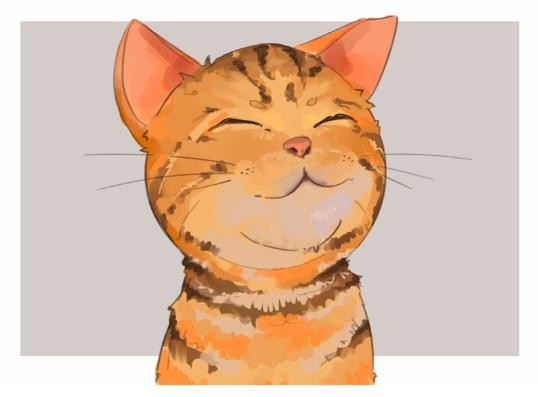
Stylized Cat Face Drawing: Unleash Your Creativity
 Stylized cat face drawing example showcasing creative interpretation
Once you understand the fundamentals of cat face drawing, you can begin to explore stylization! Stylized art allows you to bend and even break some rules to create a unique and expressive representation of a cat’s face. The key to successful stylization is a solid understanding of the underlying shapes and proportions. Think about how you can exaggerate or simplify certain features while still maintaining the essence of a cat. Experiment with pushing and pulling shapes to add interest and personality to your stylized cat face.
Choosing the Right Drawing Tablet for Digital Cat Face Art
If you’re venturing into digital cat face drawing, a good drawing tablet is an invaluable tool. The best drawing display is the one that empowers your creative vision, whether you are a beginner or a professional artist.
Drawing tablets offer a versatile platform for various creative tasks, from photo editing to animation and digital painting. The XPPen Artist Pro 16 (Gen 2) stands out as a highly practical and feature-rich option.
 XPPen Artist Pro 16 (Gen 2) drawing tablet for digital art
Realistic Color Creation: The XPPen Artist Pro 16 (Gen 2) boasts an impressive 159% sRGB color gamut, ensuring that your digital cat face drawing bursts with vibrant and accurate colors, capturing every subtle detail.
Comfort and Eye Care: The X-Nature Display is designed for comfortable extended use, reducing blue light emissions while maintaining exceptional color accuracy. The screen’s paper-like texture provides a natural drawing feel, and full lamination technology minimizes reflections for precise stroke placement.
Intuitive X-remote Control: The included X-remote Control offers quick access to frequently used functions, streamlining your workflow. It supports both wired and Bluetooth connections for flexible workspace setup.
Enhanced Precision with X3 Pro Smart Chip Stylus: Paired with the advanced X3 Pro Smart Chip Stylus, the XPPen Artist Pro 16 (Gen 2) delivers a remarkably natural and precise drawing experience. The stylus technology accurately translates electromagnetic signals into digital input, capturing every nuance of your strokes. X3 Pro Smart Chip Stylus:
Conclusion: Embrace the Art of Cat Face Drawing
In conclusion, learning cat face drawing is a rewarding and enjoyable creative endeavor. Whether you aspire to create realistic portraits or prefer a stylized interpretation, understanding the fundamental shapes and anatomy of a cat’s face is essential. Remember that consistent practice is key to improvement. With time and dedication, you will refine your skills and develop your own unique artistic style in drawing these captivating creatures.
Choosing the right drawing tools can significantly enhance your creative process, so explore different mediums and find what inspires you most. Whether you prefer traditional methods or digital tablets, the world of cat face drawing is waiting to be explored. So, grab your tools, unleash your imagination, and start creating your own charming feline portraits! Happy drawing, and may your artistic journey be filled with purrs and creativity!