
Cookie Cat! He’s a pet for your tummy!
COOKIE CAT! He’s super duper yummy!
COOKIE CAT! He left his family behind!
COOKIE CAAAT!
The jingle is instantly recognizable for any Steven Universe fan. Cookie Cat, despite his limited screen time, has become an iconic symbol of the show. Is it the undeniable cuteness? Or perhaps the subtle foreshadowing woven into his catchy tune? Whatever the reason, Cookie Cat’s charm has inspired countless creations by fiction food enthusiasts online. It’s worth noting that Diana from Fiction Food Café was ahead of the curve, publishing her Cookie Cat ice cream sandwich recipe mere hours after Steven Universe premiered!
While ice cream sandwich Cookie Cat recipes are plentiful, a full-sized Cookie Cat cake seemed to be missing from the internet’s culinary repertoire. The goal was set: create a Cookie Cat cake that’s both impressive in size, capable of feeding a crowd, and conveniently transportable. The solution? A decadent dark chocolate sheet cake layered with a delightful combination of strawberry mousse and white chocolate vanilla bean mousse. While buttercream frosting is always an option, the mousse filling elevates this cake to a truly special treat, well worth the extra effort.
JUMBO COOKIE CAT CAKE
Serves 12-15 people.
Chocolate Cake
Ingredients:
- 250g (2 1/4 cups) cake flour
- 275g (1 1/3 cups) sugar
- 60g (2/3 cup) cocoa powder
- 1 tsp baking soda
- 1 tsp baking powder
- 1 pinch salt
- 2 large eggs
- 200ml (6 1/2 fluid oz.) strong brewed coffee
- 200ml (6 1/2 fluid oz.) sour cream
- 100g (6 1/2 tbsp) melted unsalted butter
- 1 tbsp vanilla extract
Instructions:
- Preheat your oven to 325°F/160°C. Grease a 10×15″ (38x26cm) sheet cake pan and line the bottom with parchment paper for easy removal.
- In a large mixing bowl, whisk together the cake flour, sugar, cocoa powder, baking soda, baking powder, and salt until well combined.
- Create a well in the center of the dry ingredients. Pour in the strong coffee, sour cream, melted butter, vanilla extract, and eggs.
- Whisk the wet and dry ingredients together until you achieve a smooth batter, ensuring no lumps remain. For an extra smooth texture, pour the batter through a fine-mesh sieve to remove any flour clumps.
- Pour the prepared cake batter into the lined sheet pan and spread it evenly to the edges.
- Bake in the preheated oven for 12-15 minutes, or until a toothpick inserted into the center of the cake comes out clean and the cake springs back lightly when gently touched.
- Allow the chocolate cake to cool completely in the pan before frosting or assembling the Cookie Cat cake.
Strawberry Mousse
Ingredients:
- 1 1/2 cups (350ml) heavy cream
- 9 oz (250g) strawberries, fresh or frozen
- 1 tbsp powdered gelatin
- 2 tbsp cold water
- 1/3 cup (65g) granulated sugar
Instructions:
- In a small bowl, combine the powdered gelatin and cold water. Allow the gelatin to “bloom” or soften for about 5 minutes.
- If using fresh strawberries, hull and wash them. If using frozen, slightly thaw them. In a blender or food processor, puree the strawberries into a smooth sauce.
- Strain the strawberry puree through a fine-mesh sieve to remove the seeds, resulting in a seedless strawberry sauce.
- In a small saucepan, combine the strained strawberry sauce with the granulated sugar. Cook over medium heat for approximately 5 minutes, or until the mixture slightly thickens and reduces to about 1 1/2 cups in volume.
- Remove the saucepan from the heat and stir in the bloomed gelatin until it is completely dissolved into the warm strawberry mixture.
- Allow the strawberry gelatin mixture to cool to room temperature. It’s crucial that it’s not hot when you add the whipped cream.
- In a separate chilled bowl, whip the heavy cream using a whisk or electric mixer until medium peaks form. Be careful not to overwhip.
- Gently fold the whipped cream into the cooled strawberry mixture in two or three additions, until the mousse is smooth, light, and evenly pink.
- Transfer the strawberry mousse into a large piping bag fitted with a large round piping tip. Refrigerate for at least 3-4 hours, or preferably overnight, to allow the mousse to set completely.
White Chocolate Mousse
Ingredients:
- 2 tsp powdered gelatin
- 1 tablespoon water
- 1/2 cup (80ml) milk
- 1 vanilla bean, split lengthwise and seeds scraped out (or 1 tsp vanilla extract)
- 6 oz (175g) high-quality white chocolate, finely chopped
- 1 1/2 cups (350ml) heavy cream
Instructions:
- Sprinkle the powdered gelatin evenly over the water in a small bowl and let it sit for 5 minutes to bloom.
- In a small saucepan, heat the milk and vanilla bean (and scraped seeds) over medium heat until it just begins to steam. If using vanilla extract, add it later after heating the milk.
- Remove the saucepan from the heat. If using a vanilla bean, remove the bean at this point.
- Pour the hot vanilla milk over the bloomed gelatin and stir until the gelatin is completely dissolved.
- Add the finely chopped white chocolate to the hot milk mixture and let it sit for about 2 minutes to soften the chocolate.
- Whisk the mixture together until the white chocolate is completely melted and the mixture is smooth and homogenous.
- Allow the white chocolate mixture to cool to room temperature. Ensure it’s cooled but hasn’t started to set before adding the whipped cream.
- In a separate chilled bowl, whip the heavy cream to medium peaks.
- Gently fold the whipped cream into the cooled white chocolate mixture in a few additions until you have a smooth and light white chocolate mousse.
- Transfer the white chocolate mousse to a large piping bag fitted with a large round piping tip. Refrigerate for 3-4 hours, or until firm enough to pipe.
ASSEMBLY
- Print out a cookie cat template on a single A4 sheet of paper, maximizing the size to fit the page. Cut out the paper template carefully.
- Once the chocolate cake is completely cooled, place the cookie cat template on top of the cake and use a sharp knife or a paring knife to cut out two cookie cat shapes from the sheet cake. For one of the cookie cat cake layers that will be the base, carefully cut out the eye holes from the template before cutting the cake, or use a smaller cutter for the eyes later, ensuring you only cut out the eyes from one of the cake layers to create a solid base.
- Prepare your piping bags filled with strawberry and white chocolate mousses. Snip off about 1.5cm/.75″ from the tip of each piping bag to create a fairly large opening for piping.
- Place one of the solid cookie cat cake layers (the one without eye holes) onto your serving cake board or plate. To separate the two mousse flavors cleanly, use a long strip of parchment paper or plastic wrap to create a divider down the center of the cookie cat cake. You can gently score the cake surface with a knife to help anchor the divider.
- Pipe a generous layer of strawberry mousse on one side of the divider and white chocolate mousse on the other side of the divider, covering the entire surface of the cake layer.
- Use a spatula or offset spatula to gently smooth the surface of each mousse layer. You can pipe a second layer of mousse on top of the first to build up height and create a more defined shape. Smooth again.
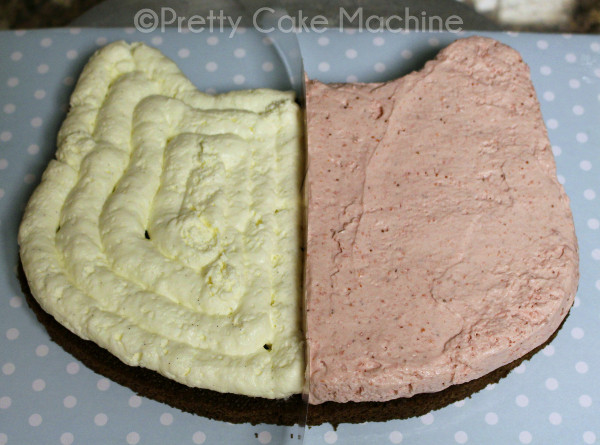 Piping bag filled with vibrant pink strawberry mousse for Cookie Cat cake layers
 Step-by-step guide to piping mousse layers onto Cookie Cat cake base
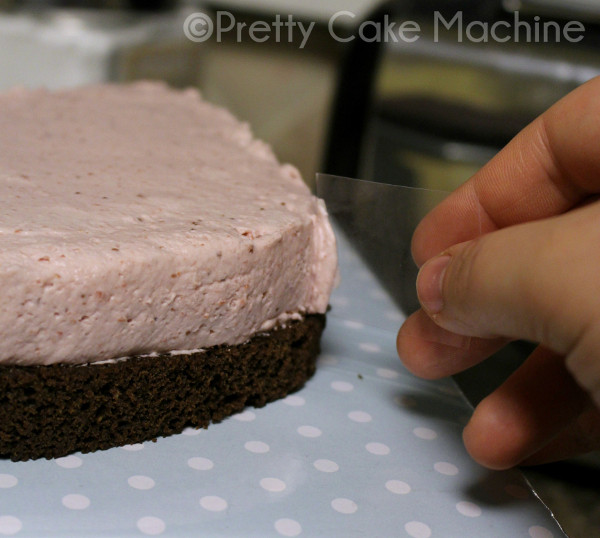
- Using a small strip of plastic wrap or a spatula, carefully refine and smooth the sides of the mousse layers for a neat finish. Smooth the tops of the mousse layers one last time.
- Carefully place the second cookie cat cake layer (the one with the eye holes cut out) on top of the mousse layers, aligning it with the base layer.
- Keep the assembled Jumbo Cookie Cat Cake covered in the refrigerator until you are ready to serve. This allows the mousse to remain firm and the cake to stay fresh.
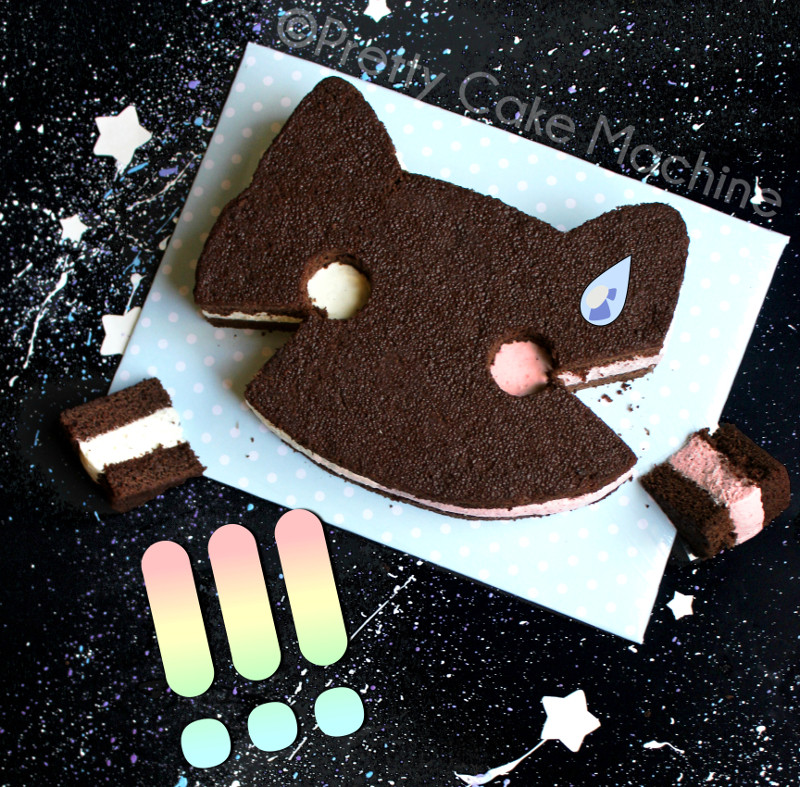 Finished Jumbo Cookie Cat Cake ready to serve, inspired by Steven Universe
This Jumbo Cookie Cat Cake is the perfect show-stopping dessert for any Steven Universe enthusiast in your life, and it’s surprisingly straightforward to make at home. If you’re new to the world of mousse making, don’t be intimidated! It’s much simpler than it seems and adds a professional bakery touch and flavor to this fun cartoon-inspired cake.
For those looking for more advanced cake decorating adventures, check out the Together Breakfast cake decorating tutorial! And explore more Steven Universe themed treats under the Steven Universe tag.