The “cat o’ nine tails” might sound like a peculiar feline, but it’s actually a type of whip, more accurately known as a flogger. Historically significant, particularly in nautical contexts where it was sometimes playfully termed “the captain’s daughter,” this tool was used for discipline aboard ships. Today, the cat o’ nine tails finds a different kind of popularity, often within the BDSM community.
This guide will walk you through crafting your own cat o’ nine tails using paracord. The example shown here is a traditional design, featuring the requisite nine tails. This number isn’t arbitrary; it’s deeply rooted in practicality and symbolism. Historically, it was derived from unraveling three lengths of three-stranded rope, naturally yielding nine individual tails.
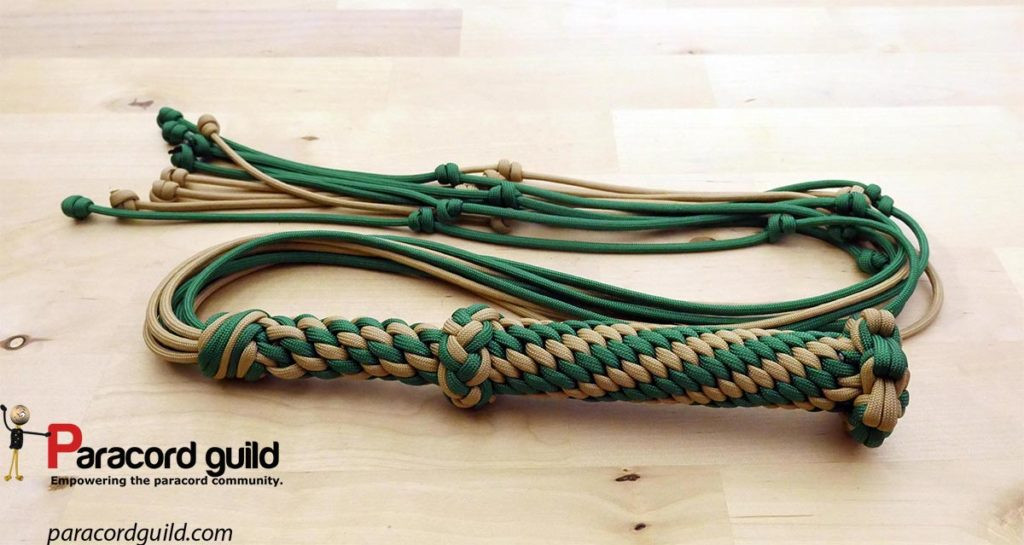 paracord-550-cat-of-nine-tails
For those eager to learn the intricate process, a detailed video tutorial is available (over an hour long!), meticulously covering each technique involved in this project. Creating this type of tutorial is a significant investment of time and effort, ensuring every step is clearly demonstrated.
This design is inspired by the work of the renowned knot expert, Des Pawson, from his book “Des Pawson’s Knot Craft and Rope Mats.” This tutorial adapts and modifies Pawson’s techniques, resulting in a unique and, arguably, impressive paracord cat o’ nine tails.
Let’s delve into the process of making this fascinating item.
Materials You’ll Need to Craft Your Flogger
To embark on this crafting journey, gather the following supplies:
- Paracord: You will need 9 pieces, each a minimum of 7.5 feet (approximately 230 cm) in length. Feel free to express your creativity with color – use a single color for a uniform look, or mix two or more colors for a more vibrant design. Paracord 550 is recommended for its durability and feel.
- Core Material: A solid core is crucial for the handle. Opt for a two-part core for enhanced structure. The inner core, which forms the main body of the handle, should be a solid piece around 8 inches long and 1/8 inch in diameter, often made of metal like brass or aluminum, easily sourced from hardware stores. The outer core, designed to add thickness to the handle, needs to be hollow so it can slide over the inner core. This piece should be about 5 inches long and ½ inch in diameter.
- Lacing Needle: Essential for neatly finishing the project, especially when weaving and tucking paracord ends.
- Scissors and Lighter: Sharp scissors for precise paracord cutting, and a lighter to melt the cut ends, preventing fraying and ensuring a clean finish.
With these materials at hand, you’re ready to begin constructing your cat o’ nine tails. The following section provides a step-by-step guide to the process, supplemented by video demonstrations of key techniques.
Step-by-Step Guide: Crafting Your Paracord Cat o’ Nine Tails
Let’s break down the construction process into manageable steps:
-
Preparing the Paracord Tails: Take your 9 pieces of paracord. Measure approximately 3 feet from one end of each cord. At this 3-foot mark, bind all 9 cords together tightly using a piece of thread. This shorter length will eventually become the tails of your flogger.
-
Creating the Handle Base with a Matthew Walker Knot: Utilize all 9 strands to tie a Matthew Walker knot. This knot can be challenging initially and requires practice. Don’t be discouraged if your first attempt isn’t perfect. The key is to dress the knot gradually, tightening and shaping it as you go until it achieves a neat and uniform appearance. Video tutorials are highly recommended for mastering the Matthew Walker knot.
-
Forming the Handle with Crown Sinnets and Cores: Begin an alternate crown sinnet using 8 of the strands, reserving one strand to act as the core for the sinnet. After completing two crown knots, insert your 8-inch solid core alongside the core strand, pushing it into the initial crown knots. Continue tying the alternate crown sinnet for about 3 inches, encasing the core.
-
Transition to a Thicker Handle: Create a smooth transition to a thicker handle section using a double diamond knot. This knot will provide a visually appealing and functional link between the thinner and thicker parts of the handle. Double the strands on the inner side of the handle as you form the diamond knot to increase bulk.
-
Adding the Outer Core and Crown Sinnet: Slide your 5-inch hollow core over the core strand and the initial solid core, positioning it directly after the diamond knot. Thread the core strand through the hollow core multiple times, pulling snugly to ensure the inner core is secure and doesn’t rattle within the handle. A lacing needle can be immensely helpful for this step. Once the outer core is in place, continue with a regular 8-stranded crown sinnet over the outer core for approximately 5 inches, building up the handle’s thickness.
-
Closing the Handle End: To neatly finish the handle’s end, apply two alternate crown knots. This creates a refined and secure closure.
-
Decorating with a Star Knot: Enhance the handle’s end with an 8-stranded star knot. This decorative knot adds a professional and polished touch.
-
Finalizing the Handle End: Crown the ends of the star knot and then double the crown knot by threading the strands back through the star knot. Use the lacing needle to guide the strands out of sight, tucking them neatly underneath the star knot. Finally, trim any excess paracord and melt the ends as close to the star knot as possible for a clean finish.
-
Adding Blood Knots to the Tails: Take the 3-foot lengths of paracord that you initially set aside for the tails. Decorate the ends of each tail with blood knots (also known as double overhand knots). Space these knots evenly along the tails for a balanced look and feel.
-
Finishing Touches: To even out the crown sinnets along the handle, you can roll them firmly between two flat planks. To stiffen the star knot at the handle’s base, carefully submerge it in boiling water for about a minute, or gently apply heat, being cautious not to burn or melt the paracord.
 paracord-cat-o-nine
In Conclusion
Crafting this paracord cat o’ nine tails flogger is indeed a testament to patience and dedication. If you successfully complete this project, you’ve not only created a unique item but also demonstrated significant crafting skill. Congratulations!
Remember, this design serves as a foundation. Feel encouraged to explore modifications, experiment with different knotting techniques that resonate with you, and play with color combinations to personalize your creation. As an example, consider the single-tone version shown above, which utilizes a different finishing knot, showcasing the versatility of this design. Let your creativity guide you in making your paracord cat o’ nine tails truly your own.