
Across neighborhoods worldwide, community cats thrive in the outdoors, expertly navigating their environment. These resilient felines are well-adapted to outdoor living, considering it their natural home. However, when winter arrives and temperatures plummet, these outdoor cats can greatly benefit from our assistance. Just as countless compassionate individuals have done, you too can make a significant difference by providing warm and secure outdoor shelters.
While cats are indeed hardy creatures, offering an outdoor cat house provides them with a sanctuary—a place to sleep, rest, stay warm, and find safety from the elements and potential dangers. This simple act of kindness can substantially improve their comfort and well-being during harsh weather conditions.
Constructing an outdoor cat house is surprisingly affordable and straightforward. It’s a rewarding DIY project that your feline neighbors will deeply appreciate, offering them a much-needed refuge from the cold.
Here’s a comprehensive guide on how to build a simple yet effective outdoor cat shelter, ensuring your neighborhood cats stay cozy and protected:
Essential Materials for Your Outdoor Cat Shelter
To build this simple and effective Cat House For Outside, gather these readily available materials:
- Large Plastic Tub (30-gallon capacity): This will serve as the main body of the cat shelter, providing ample space and weather protection.
- Small Plastic Tub (20-gallon capacity): This inner tub creates a double-walled structure, enhancing insulation and warmth retention within the cat house.
- Box Cutter: A sturdy box cutter is essential for safely and precisely cutting the plastic tubs to create entrances.
- Straw (Not Hay): Straw is crucial for insulation and bedding. Importantly, use straw, not hay, as straw repels moisture, keeping the shelter dry and warm. Hay absorbs moisture and can become moldy, which is detrimental to the cats’ health. You can often find straw at garden centers or farm supply stores.
- Permanent Marker: For marking cut lines on the plastic tubs, ensuring accurate and even entrances.
- Scissors: Useful for trimming straw or other minor adjustments during assembly.
- Hair Dryer: Applying heat with a hair dryer softens the plastic, making it significantly easier and safer to cut clean entrance holes.
- Thin Slab of Styrofoam: Styrofoam provides an extra layer of insulation at the base of the shelter, protecting against ground cold.
- Plastic Flowerpot (Non-Tapered): A plastic flowerpot, one that doesn’t narrow sharply at the bottom, will be repurposed as a tunnel entrance, offering additional protection from wind and weather.
Step-by-Step Guide to Building Your DIY Cat House for Outside
Follow these detailed steps to assemble your durable and cozy outdoor cat shelter:
-
Mark the Entrance on the Outer Tub: Place the plastic flowerpot against the side of the larger 30-gallon plastic tub. Use the permanent marker to carefully trace the outline of the flowerpot opening onto the tub. This marked area will be the entrance to your cat house.
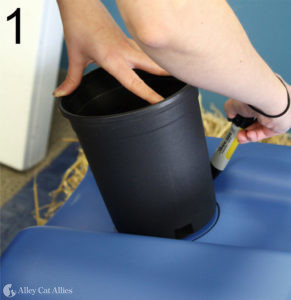 Marking entrance on large tub for DIY cat house for outside
 -
Soften the Plastic for Easy Cutting: Using the hair dryer, gently heat the plastic along the marked entrance outline. Apply heat for a few minutes to soften the plastic, making it pliable and much easier to cut cleanly and safely with the box cutter. This step is crucial for preventing cracking and ensuring smooth edges.
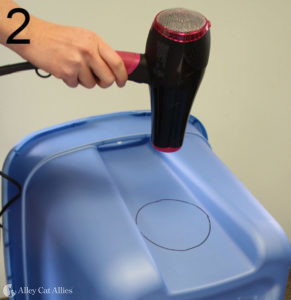 Softening plastic with hairdryer for cat house for outside entrance
 -
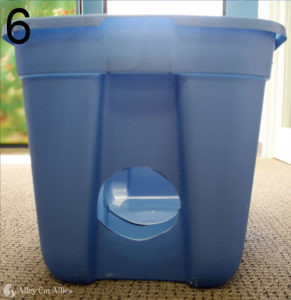
Cut the Entrance Hole: Carefully use the box cutter to cut out the entrance hole in the large plastic tub, following the softened outline you created. Exercise extreme caution when using the box cutter to avoid injury. Cut slowly and steadily, and always cut away from yourself.
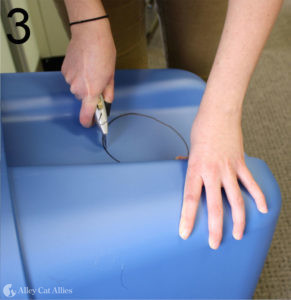 Cutting entrance hole for outdoor cat house
 -
Prepare the Base Insulation: Place the thin slab of Styrofoam at the bottom of the large plastic tub. This layer of Styrofoam will provide essential insulation from the cold ground, keeping the shelter warmer and more comfortable for the cats. Then, place the smaller 20-gallon tub inside the larger tub, resting on top of the Styrofoam.
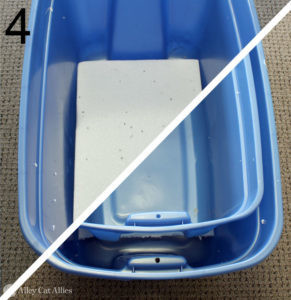 Adding styrofoam base for insulated cat house for outside
 -
Mark the Inner Tub Entrance: Align the inner and outer tubs carefully. Using the entrance you already cut in the larger tub as a template, trace the outline of this entrance onto the side of the smaller, inner tub with the permanent marker. This ensures that the entrances of both tubs will align perfectly.
 Marking inner tub entrance for double walled cat house
 -
Cut the Inner Tub Entrance: Repeat steps 2 and 3 for the smaller, inner tub. Soften the plastic along the marked outline using the hair dryer, and then carefully cut out the entrance hole using the box cutter. Again, take precautions to avoid injury during this step.
 Cutting inner tub entrance for outdoor cat shelter
 -
Insulate with Straw Between Tubs: Place the smaller tub inside the larger tub. Pack the space between the two tubs tightly with straw. Straw acts as excellent insulation, trapping heat and keeping the cat house warm. Ensure the straw is packed firmly to maximize its insulating properties and to prevent moisture buildup. Remember, straw is the superior choice over hay for outdoor cat shelters due to its moisture-repelling qualities.
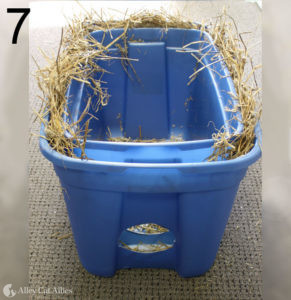 Insulating between tubs with straw for warm cat house
 -
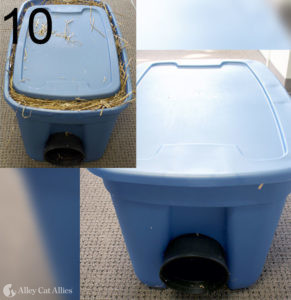
Add Straw Bedding: Fill the smaller, inner tub generously with loose straw. This thick layer of straw will serve as comfortable and insulating bedding for the cats. Ensure there is plenty of straw for the cats to burrow into and stay warm, especially during colder nights.
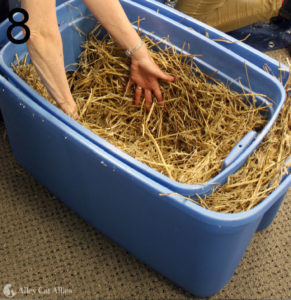 Adding straw bedding to inner tub of cat shelter
 -
Create a Tunnel Entrance with Flowerpot: Modify the plastic flowerpot to create a tunnel entrance. Cut out the bottom of the flowerpot using scissors or a box cutter. Slide the flowerpot into the aligned entrance holes of both the large and small tubs, creating a short tunnel. This tunnel entrance helps to block wind, rain, and snow from directly entering the shelter, providing added protection and security for the cats. You may need to slightly trim the edges of the plastic tub entrances to ensure a snug fit for the flowerpot tunnel.
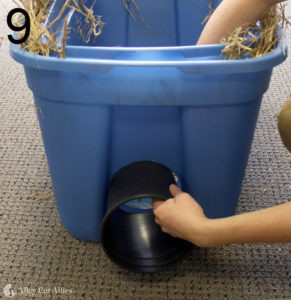 Creating tunnel entrance with flowerpot for weatherproof cat house
 -
Secure the Lids: Place the lids securely on both the inner and outer tubs. Ensure the lids are firmly in place to provide maximum weatherproofing and insulation. This completes your DIY outdoor cat house, ready to offer warmth and shelter to outdoor cats.
 Completed DIY cat house for outside with lids secured
This double-tub design, insulated with straw and featuring a tunnel entrance, creates a robust and effective cat house for outside, providing excellent protection from cold, wind, and rain.
This is just one simple design for an outdoor cat shelter. For more ideas and options, including pre-built shelters, visit alleycat.org/ShelterGallery and explore various ways to help community cats in your area.
Alley Cat Allies, founded in 1990, is a global leader in cat advocacy, dedicated to protecting and improving the lives of all cats. Learn more about their work at www.alleycat.org.
