Across neighborhoods and communities, many cats live outdoors, expertly navigating their environment. These community cats are well-adapted to outdoor living, considering the outside world as their true home. However, when winter approaches and cold weather sets in, they can certainly benefit from our assistance. Just like countless others, you can make a significant difference by providing them with warm and secure outdoor shelters.
While cats are remarkably resilient creatures, offering an outdoor cat house provides them with a sanctuary where they can sleep, rest, warm up, and find safety, making their outdoor lives much more comfortable, especially during harsh weather conditions.
Building an outdoor cat house is a straightforward, affordable project, and it’s a gesture that your feline neighbors will deeply appreciate!
Here’s a simple guide on how to create one:
Watch this helpful video for visual instructions: Cat Tips: DIY Outdoor Cat Shelter on YouTube.
Materials You’ll Need for Your DIY Cat House
Before you begin, gather these readily available materials:
- A large plastic tub (around 30 gallons): This will serve as the main body of the Cat House Outdoor.
- A smaller plastic tub (approximately 20 gallons): This will create an insulated inner layer for added warmth.
- Box cutter: For safely cutting plastic to create entrances.
- Straw (NOT hay): Straw acts as excellent, moisture-resistant insulation and bedding. Hay retains moisture and can become moldy, so avoid using it.
- Permanent marker: To mark cutting lines for the entrances.
- Scissors: Useful for trimming straw or other materials.
- Hair dryer: To soften plastic for easier and safer cutting.
- Thin slab of Styrofoam: To insulate the base of the cat house from the cold ground.
- Plastic flowerpot (non-tapering): To create a sheltered, tunnel-like entrance, enhancing security and warmth.
Step-by-Step Guide to Building Your Outdoor Cat House
Follow these simple steps to assemble a warm and protective cat house outdoor:
-
Mark the Entrance on the Large Tub: Place the plastic flowerpot against the side of the larger plastic tub. Use the permanent marker to trace around the flowerpot, outlining the desired entrance size and shape.
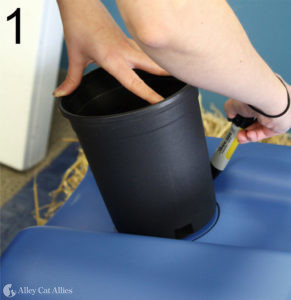 Outline of cat house entrance being drawn on a plastic tub
 -
Soften the Plastic for Cutting: Using a hair dryer, gently warm the plastic along the marked outline. Heating the plastic makes it significantly easier and safer to cut, reducing the risk of cracking or sharp edges.
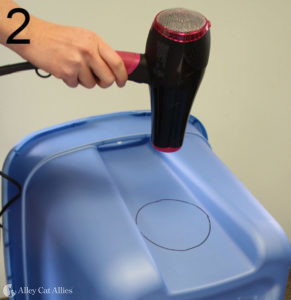 Softening plastic tub with hair dryer to cut cat house entrance
 -
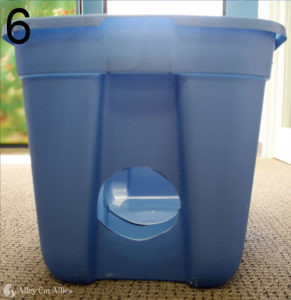
Cut Out the Entrance: Carefully use the box cutter to cut along the softened outline, creating the entrance to the cat house. Exercise caution and always cut away from yourself to prevent injuries.
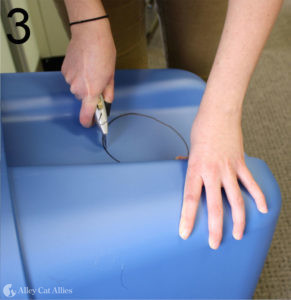 Cutting the entrance of a DIY cat house using a box cutter
 -
Prepare the Base Insulation: Place a thin slab of Styrofoam at the bottom of the large tub. This layer of Styrofoam will insulate the cat house from the cold ground, providing extra warmth. Then, place the smaller tub inside the larger tub, resting on the Styrofoam.
-
Mark the Inner Tub Entrance: Align the smaller tub inside the larger one, ensuring the entrances will match. Use the entrance already cut in the large tub as a template to mark the entrance on the smaller, inner tub.
 Marking entrance on inner tub using outer tub entrance as guide
 -
Cut the Inner Tub Entrance: Repeat steps 2 and 3 to cut out the entrance in the smaller, inner tub. Soften the plastic with the hairdryer and then carefully cut along the marked outline with the box cutter.
 Cutting entrance in smaller inner tub for double-layered cat house
 -
Insulate with Straw Between Tubs: Place the smaller tub inside the larger tub. Pack the space between the two tubs with straw. Straw is crucial because it repels moisture and provides excellent insulation. Remember, do not use hay as it retains moisture and can become moldy, which is harmful to cats.
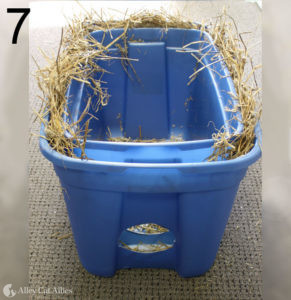 Insulating between tubs of cat house with straw for warmth
 -
Add Bedding Straw: Fill the interior of the smaller tub with a generous amount of straw. This thick layer of straw will serve as warm and comfortable bedding for the cats, keeping them insulated from the cold.
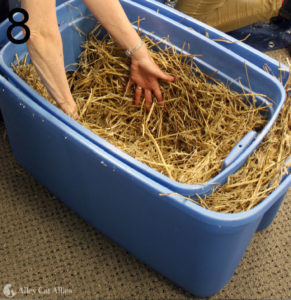 Filling inner tub of cat house with straw bedding for cats
 -
Create a Tunnel Entrance with Flowerpot: Modify the plastic flowerpot to create a protective tunnel entrance. Cut out the bottom of the flowerpot and slide it into the aligned entrances of both the large and small tubs. You might need to trim the edges of the entrances slightly to ensure the flowerpot fits snugly, creating a draft-proof tunnel.
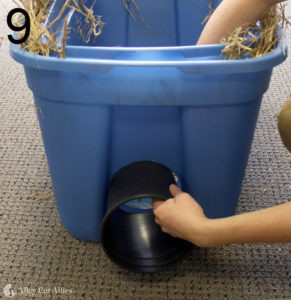 Using flowerpot as tunnel entrance for weatherproof cat house
 -
Secure the Lids: Place the lids on both the smaller and larger tubs. Ensure they are securely fastened to protect the interior from rain and snow, completing your DIY cat house outdoor!
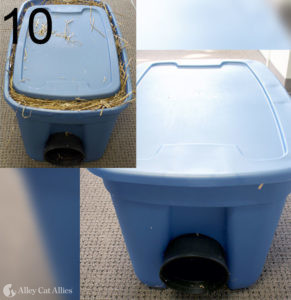 Completed DIY outdoor cat house with lid and tunnel entrance
This double-tub design is just one effective method for creating a cat house outdoor. Numerous other designs and pre-made options are available to suit different needs and environments. Explore more ideas for both DIY and commercially available outdoor cat shelters at alleycat.org/ShelterGallery.
Providing a cat house outdoor is a simple yet impactful way to support community cats, offering them essential protection and comfort during colder months. Your efforts can significantly improve the well-being of these resilient outdoor felines.