
Have you ever considered that your cat’s meal could be the key ingredient to your next backcountry adventure? It might sound unconventional, but the humble cat food can, specifically a Fancy Feast can, is the surprising foundation for an incredibly efficient and lightweight backpacking stove. My journey with this ingenious design began in the spring of 2006, thanks to Ryan Bozis (Major Slacker), who introduced me to the concept after one of my presentations. Initially skeptical, especially given my reliance on a more complex Red Bull can stove, I was soon to be amazed.
After putting the Fancy Feast stove to the test against my trusted model and several other designs, the results were undeniable. This seemingly simple stove outperformed them all in speed and fuel efficiency. Beyond performance, it was also lighter, used fewer materials, was remarkably inexpensive to make, and cleverly doubled as its own pot stand, streamlining my entire cooking system. Plus, it required no pre-heating – a significant convenience in the backcountry. Since that summer of 2006, this has been my go-to stove model.
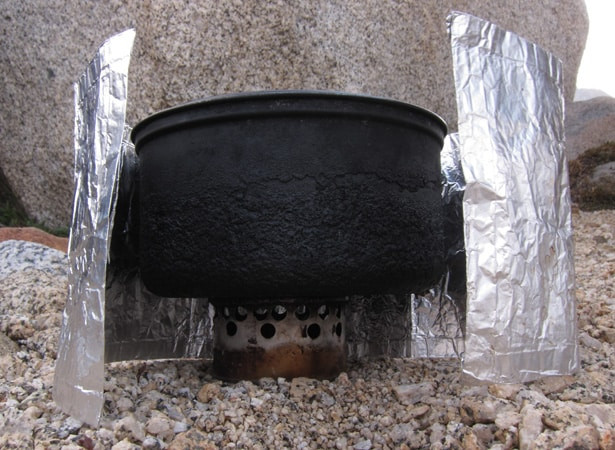 Complete Fancy Feast stove setup, showcasing the windscreen and stove after extensive use, evidenced by soot from open fires on the pot, not the stove itself.
Key Features and Advantages
- Ultralight Weight: A mere 0.3 oz (approximately 10 grams), making it a featherlight addition to your pack.
- Budget-Friendly: The cost is minimal, around $0.50 for the cat food can (including tax) and $3-$5 for a hole punch.
- Durable and Reliable: It’s designed to last. It will never clog, and with no moving or delicate parts, breakage is rarely a concern. Even if crushed, it’s often possible to reshape and reuse it.
- Integrated Pot Stand: Serves as its own pot stand, reducing the number of items you need to carry and simplifying your cooking setup.
- Versatile Fuel Source: Burns denatured alcohol, a readily available and affordable fuel. You can find it in hardware stores (paint department), gas stations (HEET gas-line antifreeze), and hiking hostels. Alternatives like Everclear or grain alcohol can also be used, though they are more expensive. Denatured alcohol is easily stored in plastic bottles from Platypus or common drink brands.
- Efficient Fuel Consumption: Boils approximately 1.5 cups of water using just about 0.6 oz of alcohol. Boil times are typically between 5-7 minutes, depending on your pot, water starting temperature, and windscreen efficiency.
Disadvantages to Consider
- Size Limitations: With a diameter of only 2.5 inches, stability can be an issue with larger pots. For bigger cookware, consider using a larger can, such as a tuna fish can, as a substitute for the Fancy Feast can.
- Pot Size Compatibility: Smaller pots, like 600 ml mugs, may not receive sufficient flame from this side-burner design. A top-burner model might be more efficient in such cases.
- No Flame Control: This stove lacks a simmer function, meaning no flame output adjustment. However, if your backcountry cooking is primarily focused on boiling water for simple meals like pasta, couscous, dehydrated foods, and soups, this won’t be a problem.
- No Off Switch: The stove burns until the fuel is depleted. To extinguish the flame, you must smother it with a pot, mug, dirt, or water. Blowing it out is difficult but possible.
- Slower than Pressurized Stoves: It’s not as fast as white gas or canister stoves. If shaving a few minutes off your cooking time is paramount and you’re willing to carry extra weight, those might be preferable. Personally, I use the boil time to relax, plan the next day’s route, organize my food, or set up camp.
Essential Supplies for Your DIY Stove
To create your own Fancy Feast stove, you will need just two main items:
- 3-oz Fancy Feast cat food can: Or another can of similar size. Generic brands often work just as well and may be even cheaper.
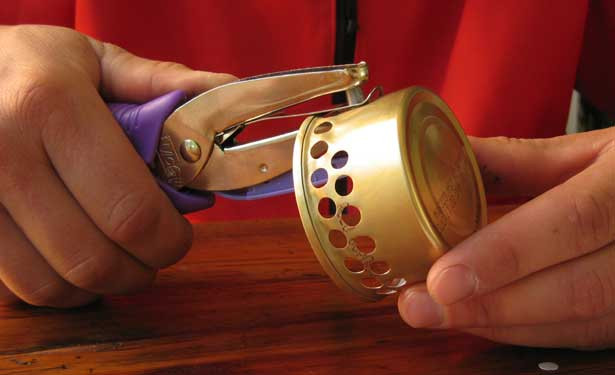
- Single-hole punch: A standard hole punch works, but a craft model with a longer reach makes the process easier. The longer reach allows for holes further from the can’s edge.
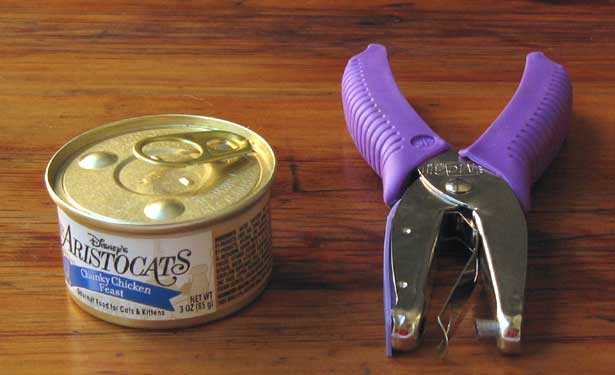 Essential supplies for making a cat food can stove: a Fancy Feast cat food can and a single-hole punch.
Step-by-Step Construction Guide
Watch the video for a visual guide!
-
Prepare the Can: Start by removing the cat food and thoroughly washing the empty can.
-
Smooth the Edge: Use the hole punch (or a butter knife or similar object) to flatten the sharp edge left after removing the lid. This prevents cuts.
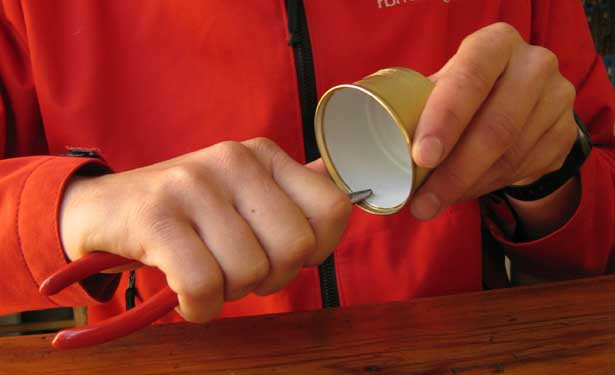 Using a hole punch to flatten the sharp edge of the cat food can for safety during stove construction.
- Create the Top Row of Holes: Just below the can’s lip, punch a complete circle of holes. Space them about one-eighth of an inch apart to avoid tearing the thin metal.
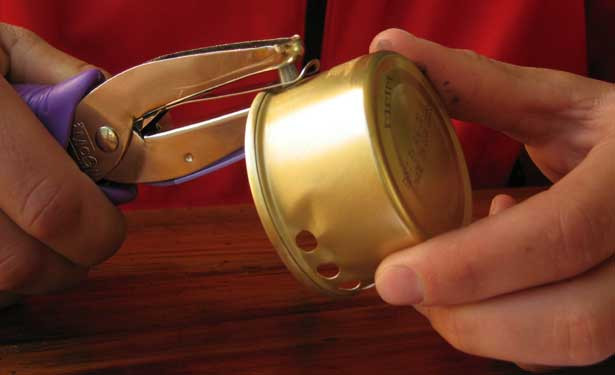 Close-up showing the top row of punched holes around the lip of the Fancy Feast can, evenly spaced for optimal airflow.
- Create the Bottom Row of Holes: Add a second row of holes beneath the first. Align the middle of these lower holes directly under the gaps between the holes in the upper row.
 Detailed view of both rows of holes on the cat food can stove, highlighting the staggered arrangement for efficient burning.
- Craft a Windscreen: A windscreen is crucial for this stove’s performance. Follow my separate guide on making a windscreen for a Fancy Feast stove. A windscreen is essential, especially in windy conditions, to achieve a boil.
Operating Instructions for Efficient Cooking
Using the Fancy Feast stove is straightforward.
- Fueling: Pour denatured alcohol into the stove.
- Ignition: Light the alcohol with a match or lighter.
- Warm-up: Allow 20-30 seconds for the fuel to heat up.
- Cooking: Place your pot on top of the stove.
My preferred method for cooking with this stove involves using slightly less water than needed for full meal rehydration. Once the food absorbs the boiled water, I add non-boiled water to reach the desired consistency. This approach saves fuel, prevents overly watery meals, and cools the food down to eating temperature quickly.
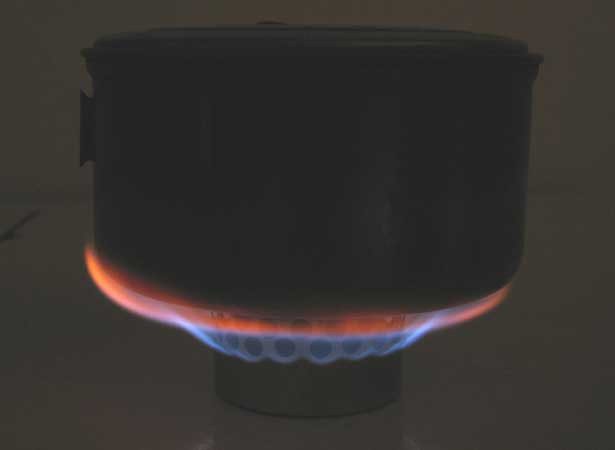 The Fancy Feast stove in operation, showing a steady flame as it boils water for a backcountry meal.
Stove Variations for Different Needs
The standard 3-oz Fancy Feast stove is perfect for solo backpacking with a pot around 1 liter. I personally use a 0.9-liter Evernew titanium pot, which has a 5-inch base. If you plan to use a larger pot and are concerned about stability on the small Fancy Feast can base, simply use a larger can, like a tuna can, and follow the same construction steps.
While I haven’t conducted formal tests, it’s logical to assume that the number of holes influences the stove’s heat output and fuel efficiency. More holes likely lead to a hotter but less fuel-efficient burn, while fewer holes may result in a cooler but more efficient burn. The optimal number of holes probably depends on factors like pot material, water volume and temperature, and windscreen performance. These variables make extensive testing complex.