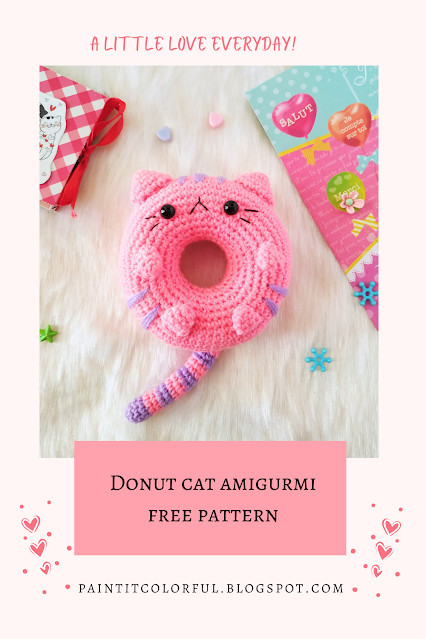
Just like everyone loves donuts, crafting cute amigurumi food is an absolute joy! If you’ve enjoyed making adorable food-themed amigurumi before, like unicorn macarons, pumkitty pies, octopus cupcakes, or bunny macarons, then you’re in for a treat. Today, we’re diving into creating an irresistibly charming cat donut amigurumi. This delightful project is perfect for adding a touch of sweetness and feline fun to your crochet collection. Get ready to combine your love for cats and donuts with this free Cat Pattern!
Please note: This pattern is intended for personal use only. Kindly refrain from copying, reproducing, altering, translating, or distributing this pattern in any form. You are welcome to sell finished items made using this pattern, but please give credit to me as the pattern designer and include a link back to this original post.
This pattern is written using US English crochet terms and is worked in continuous rounds unless otherwise specified. For those who prefer an ad-free, printable PDF version with detailed step-by-step photos, it is available for purchase in my Ravelry shop.
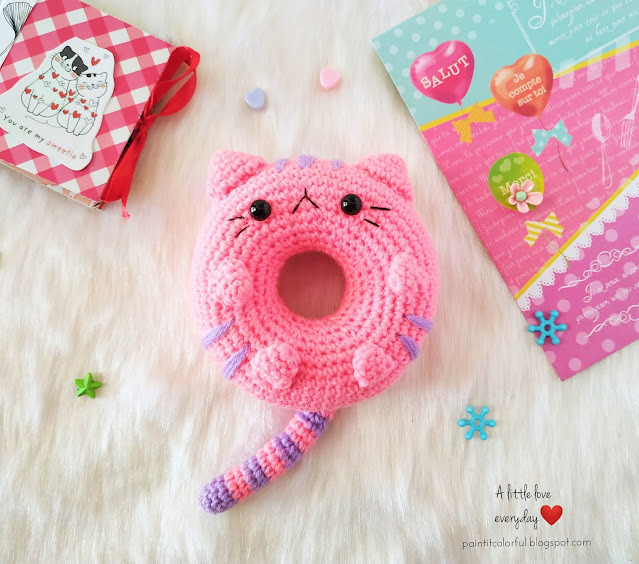 Close up of a crocheted donut cat amigurumi with pink frosting and sprinkles
Materials Needed:
- Sport weight yarn in main color (MC) for the donut base and contrasting color (CC) for the frosting.
- 2.5 mm crochet hook.
- Fiber fill stuffing.
- 8 mm safety eyes.
- Black embroidery thread.
- Tapestry needle.
Abbreviations:
- R – round/ row
- Ch – chain
- St – stitch
- Sc – single crochet
- Inc – increase (2 sc in the same stitch)
- Dec – decrease (sc 2 stitches together)
- Sl st – slip stitch
- [..] – repeat the instructions within the brackets
- (..) – total number of stitches in the round
Donut Pattern:
Using your main color yarn (MC):
Chain 30, then slip stitch to the first chain to create a ring. Ensure the loop is not twisted when joining.
R1: Single crochet (sc) in the first chain and in each remaining chain around (30 stitches).
R2: Repeat the following sequence 6 times: [Single crochet in the next 2 stitches, increase (inc), single crochet in the next 2 stitches] (36 stitches).
R3: Repeat the following sequence 6 times: [Single crochet in the next 5 stitches, increase] (42 stitches).
R4: Repeat the following sequence 6 times: [Single crochet in the next 3 stitches, increase, single crochet in the next 3 stitches] (48 stitches).
R5: Repeat the following sequence 6 times: [Single crochet in the next 7 stitches, increase] (54 stitches).
R6: Repeat the following sequence 6 times: [Single crochet in the next 4 stitches, increase, single crochet in the next 4 stitches] (60 stitches).
R7: Repeat the following sequence 6 times: [Single crochet in the next 9 stitches, increase] (66 stitches).
R8 – R17: Single crochet in each stitch around (66 stitches for each round).
R18: Repeat the following sequence 6 times: [Single crochet in the next 9 stitches, decrease (dec)] (60 stitches).
R19: Repeat the following sequence 6 times: [Single crochet in the next 4 stitches, decrease, single crochet in the next 4 stitches] (54 stitches).
R20: Repeat the following sequence 6 times: [Single crochet in the next 7 stitches, decrease] (48 stitches).
R21: Repeat the following sequence 6 times: [Single crochet in the next 3 stitches, decrease, single crochet in the next 3 stitches] (42 stitches).
R22: Repeat the following sequence 6 times: [Single crochet in the next 5 stitches, decrease] (36 stitches).
R23: Repeat the following sequence 6 times: [Single crochet in the next 2 stitches, decrease, single crochet in the next 2 stitches] (30 stitches).
Fasten off, leaving a long tail for sewing.
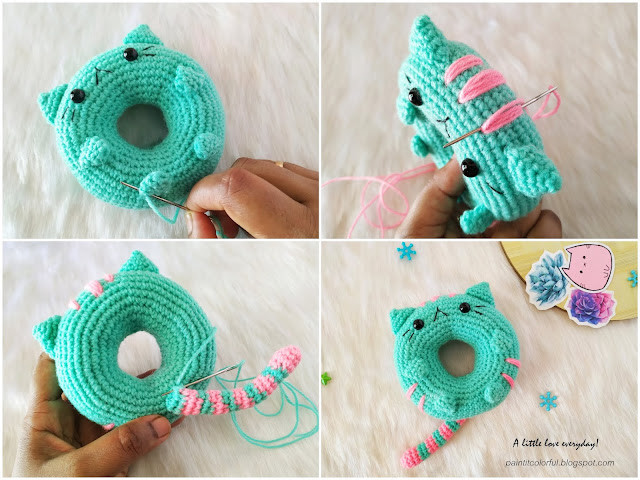
Insert the 8 mm safety eyes between rounds 17 and 18, positioning them 9 stitches apart.
Using black embroidery thread, embroider the mouth and whiskers.
Sew round 1 and round 23 together using a whip stitch.
Stuff the donut firmly as you sew and close the opening completely.
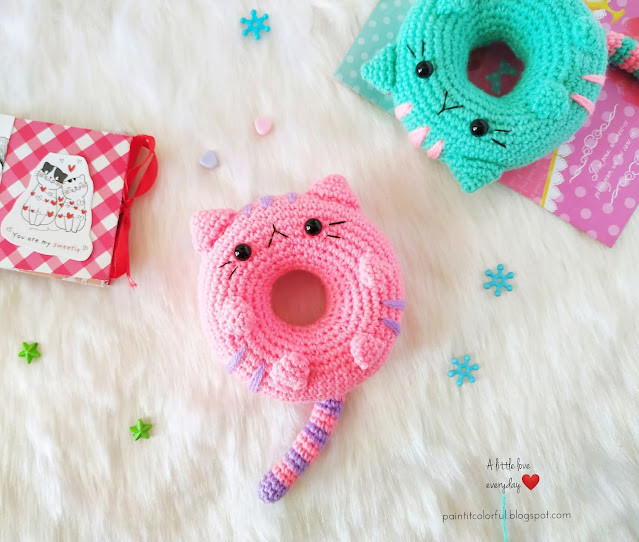
 Two finished donut cat amigurumi, one pink and one purple, laying on a wooden surface
Ears Pattern (Make 2):
Using your main color yarn (MC):
R1: Make 4 single crochet stitches into a magic ring (4 stitches).
R2: Repeat the following sequence 2 times: [Single crochet in the next stitch, increase] (6 stitches).
R3: Repeat the following sequence 3 times: [Single crochet in the next stitch, increase] (9 stitches).
R4: Repeat the following sequence 3 times: [Single crochet in the next 2 stitches, increase] (12 stitches).
R5: Repeat the following sequence 3 times: [Single crochet in the next 3 stitches, increase] (15 stitches).
Fasten off, leaving a long tail for sewing.
Legs Pattern (Make 4):
Using your main color yarn (MC):
R1: Make 6 single crochet stitches into a magic ring (6 stitches).
R2: Single crochet in each stitch around (6 stitches).
R3: Repeat the following sequence 2 times: [Single crochet in the next 2 stitches, increase] (8 stitches).
Single crochet through both layers at the top of the leg to flatten and close.
Fasten off, leaving a long tail for sewing.
Tail Pattern:
Start with contrasting color yarn (CC).
R1: Make 6 single crochet stitches into a magic ring (6 stitches).
R2: Repeat the following sequence 3 times: [Single crochet in the next stitch, increase] (9 stitches).
R3-4: Single crochet in each stitch around (9 stitches for each round).
Switch to main color yarn (MC). R5-6: Single crochet in each stitch around (9 stitches for each round).
(Switch back to CC) R7-8: Single crochet in each stitch around (9 stitches for each round).
(Switch back to MC) R9-10: Single crochet in each stitch around (9 stitches for each round).
(Switch back to CC) R11-12: Single crochet in each stitch around (9 stitches for each round).
(Switch back to MC) R13-14: Single crochet in each stitch around (9 stitches for each round).
(Switch back to CC) R15-16: Single crochet in each stitch around (9 stitches for each round).
(Switch back to MC) R17-18: Single crochet in each stitch around (9 stitches for each round).
(Switch back to CC) R19-20: Single crochet in each stitch around (9 stitches for each round).
(Switch back to MC) R21: Single crochet in each stitch around (9 stitches).
Stuff the tail lightly and single crochet through both layers to flatten and close the opening.
Fasten off, leaving a long tail for sewing.
 Side view of a crocheted cat donut amigurumi with purple frosting and colorful sprinkles
Assembling Your Donut Cat:
- Attach the ears approximately 3 rounds above the safety eyes.
- Sew on the forelegs and hind legs to the bottom of the donut.
- Using a strand of contrasting color yarn, create 3 forehead stripes in the space between the ears.
- Similarly, make 2 stripes in the space between the forelegs and hind legs on each side of the donut.
- Attach the tail to the back of the donut.
Congratulations! Your adorable Donut Cat amigurumi is now complete!
I genuinely hope you enjoyed creating this sweet treat. Please share your finished creations on Instagram using the hashtag #littleloveeveryday. I would be absolutely thrilled to see your unique renditions of this cat pattern.
 Promotional image with text "A little love everyday!" and social media icons
If you’re a fan of feline-inspired crochet, be sure to check out the pastel Pusheen pattern for more cat crafting fun. Wishing you a wonderful day and happy crocheting!