
Cats, with their captivating blend of fluffiness and wild grace, are truly remarkable creatures. Often described as miniature panthers, their elegance and naturally охотничий (hunting) physique make them an inspiring subject for artists. Learning to draw cats not only allows you to capture their unique beauty but also provides foundational skills applicable to drawing other animals, including dogs and even horses, due to their surprising anatomical similarities. This guide will walk you through the essential steps to drawing cats, making the process accessible and enjoyable for artists of all levels.
 Step-by-step cat drawing tutorial
Understanding Simplified Cat Anatomy for Drawing
To effectively draw cats, grasping the basics of their anatomy is crucial, even in a simplified form. While the intricate details of the skeletal and muscular systems might seem daunting, we can focus on the visible structure that dictates a cat’s shape and movement. Think of it as building a framework before adding the details.
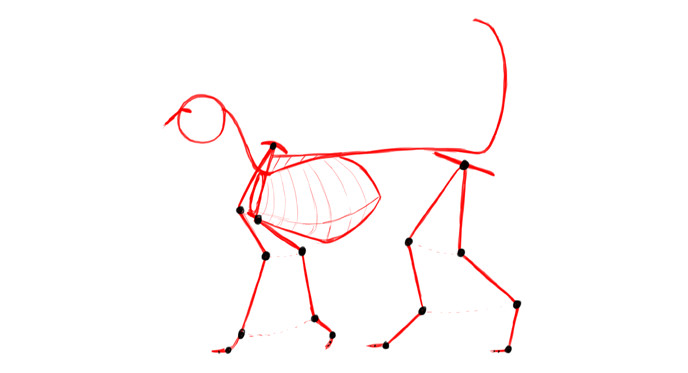
A cat’s skeleton, the underlying structure, can be visualized as a series of connected lines. Understanding the proportions and the placement of joints is key. Practice visualizing this skeletal framework; it’s the foundation upon which you’ll build your cat drawing.
 Simplified cat skeleton for artists
The best way to internalize this simplified skeletal structure is through practice. Use photographs of cats as references and try to sketch the “skeleton” you perceive beneath their fur. Repeating this exercise with numerous photos will help this process become intuitive. For a more challenging practice, try sketching the skeletal structure from memory after briefly looking at a reference photo. This strengthens your understanding of cat anatomy and improves your ability to draw cats from imagination.
 Animated guide to drawing cat anatomy
Pay close attention to the spine when drawing cats. Its remarkable flexibility, limited only by the ribcage and hips, is central to capturing their characteristic poses and movements.
 Cat outline sketches for drawing practice
While muscles are anatomically complex, drawing a cat’s musculature can be surprisingly straightforward. Cats possess relatively loose skin, which softens the definition of their muscles, even in breeds with short hair. This characteristic simplifies the drawing process considerably.
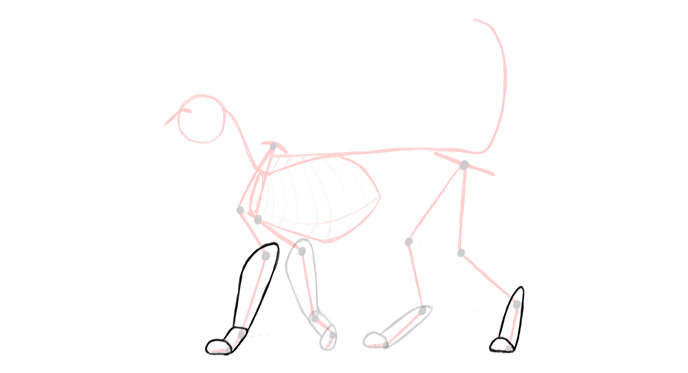
Once you have the skeletal framework in place, you can begin to flesh out the body parts. Start with the paws…
 Drawing cat paws anatomy
…followed by the thigh and shoulder areas…
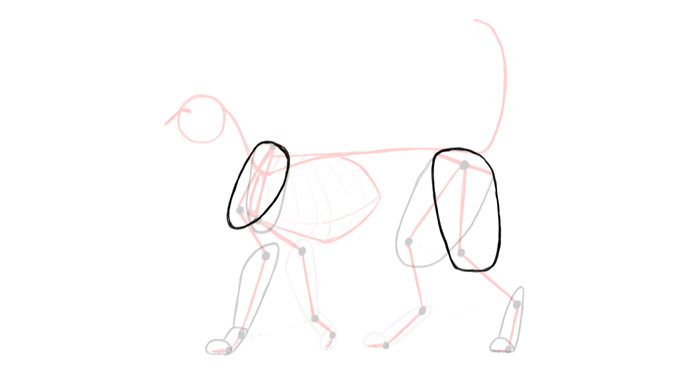 Drawing cat thigh and shoulder anatomy
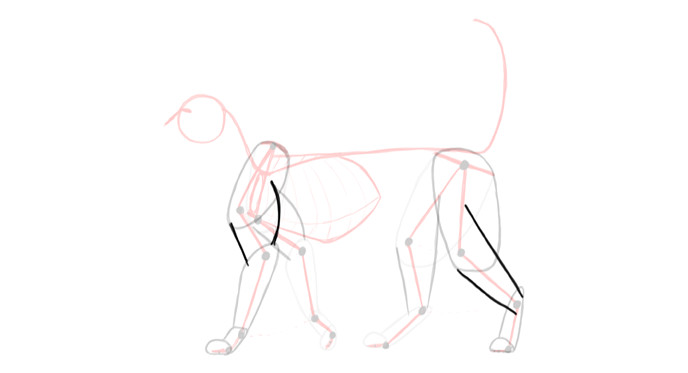
…then the arm and calf sections…
 Drawing cat arm and calf anatomy
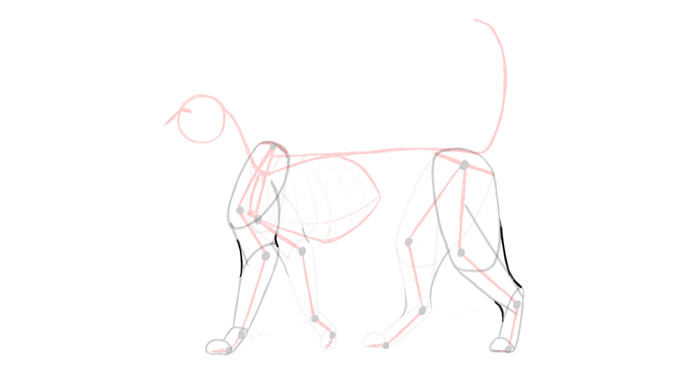
…and finally, visualize the loose skin connecting these segments.
 Visualizing loose skin on cat anatomy for drawing
Now, define the main body outline. A simplified, blocky shape, perhaps resembling a long loaf of bread, can serve as a useful starting point.
 Basic body shape for drawing cats
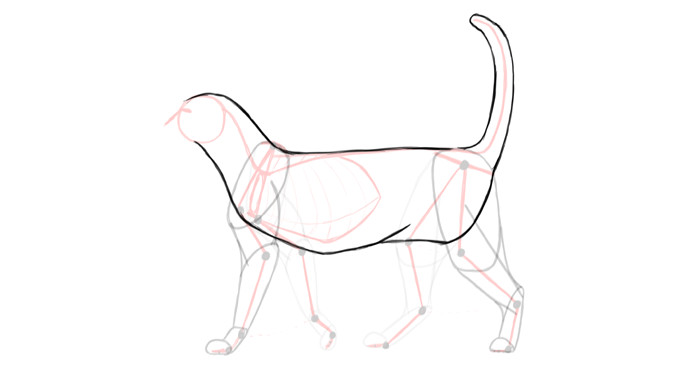
Envelop these components with the loose skin, refining the outlines as needed. Imagine the cat wearing “one-piece pajamas”—form-fitting around specific body parts but looser in the connecting areas.
 Step-by-step drawing of a cat's body
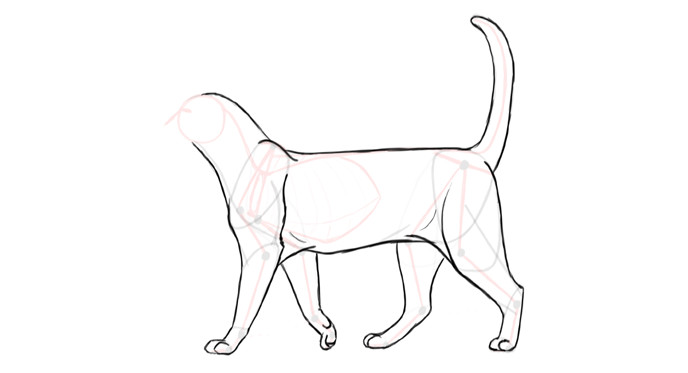
There isn’t a single, definitive method for assembling the cat’s body. Experiment to discover what works best for you! Consistent practice using diverse photographic references will deepen your understanding and make the drawing process more fluid and instinctive. Develop a method that feels natural and efficient for your artistic style.
 Animated steps to draw a cat's body
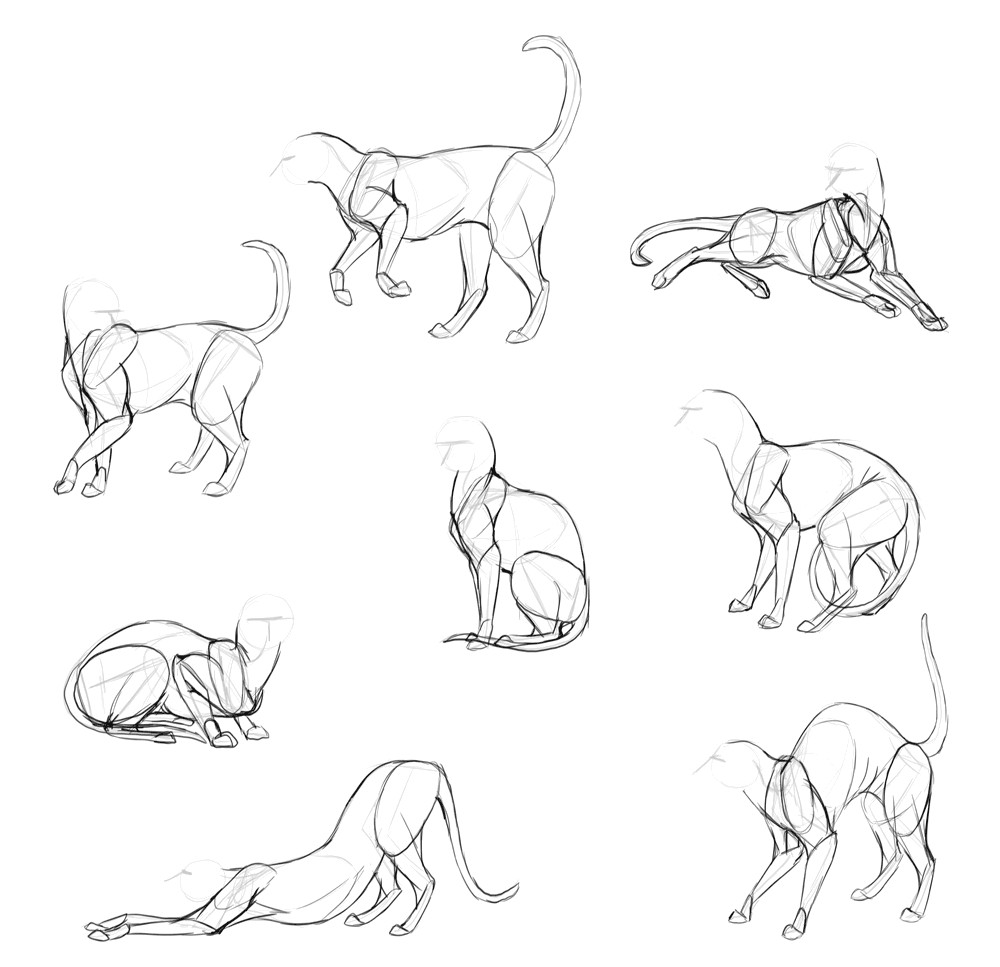 Simple cat drawings using basic shapesCats constructed from a skeleton to skin using simple shapes and consistent practice.
Step-by-Step Guide to Drawing a Cat’s Head
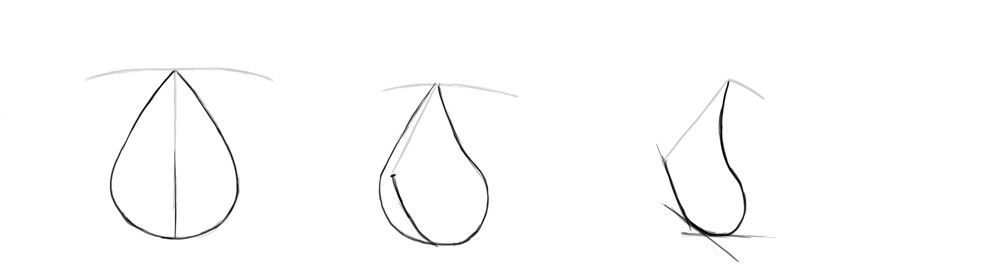
Cats exhibit a remarkable variety of head shapes, yet a common set of proportions defines the quintessential “cat face.” While precise memorization isn’t necessary, understanding the general guidelines is key. Begin by sketching a T-shape, imagining it superimposed on the head area. These lines represent the eye and nose levels and are crucial for establishing the head’s orientation, even before the complete shape is defined.
 Initial T-shape guideline for cat head drawing
Next, add the muzzle. Shape it like a sack, attaching it to the point where the eye and nose lines intersect.
 Adding muzzle shape to cat head drawing
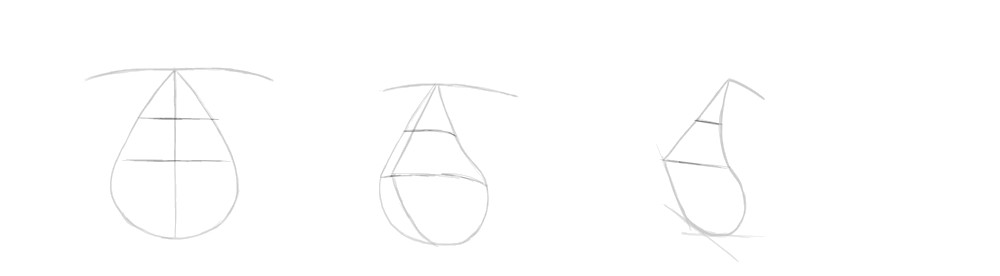
Divide the muzzle in half vertically, and then further bisect the upper half. This division helps establish the length of the nose bridge. While breed variations exist, halving the muzzle provides a reliable starting point for a generic cat.
 Dividing muzzle for nose bridge proportion in cat drawing
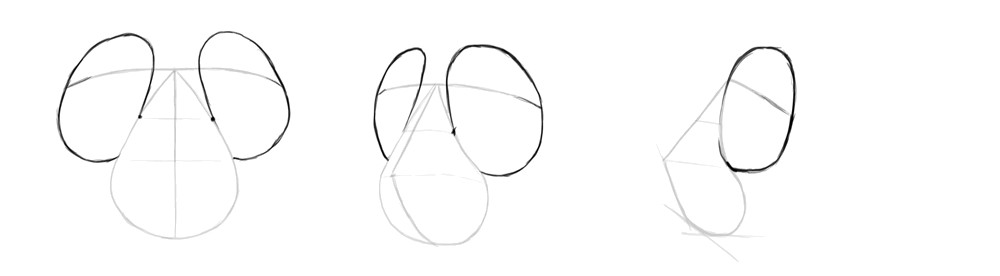
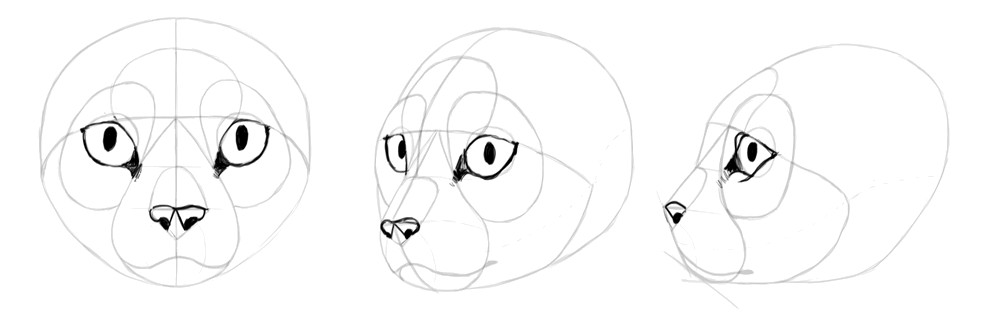
Temporarily envision your cat as a panda! Sketch circular patches around the eye area.
 Creating eye patches for cat head drawing
Position the eyes centrally within each “eye patch.” Ensure they don’t touch the muzzle and slightly intersect the initial eye line.
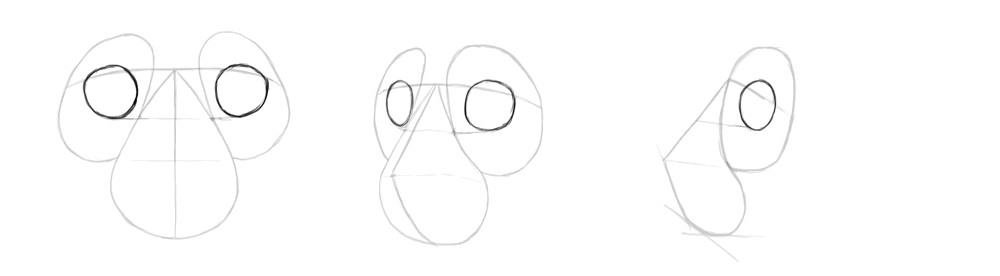 Placing eyes within eye patches in cat drawing
Add the forehead. It can extend directly from the nose line, or you can introduce a slight “step” at this juncture, depending on the cat breed you’re depicting.
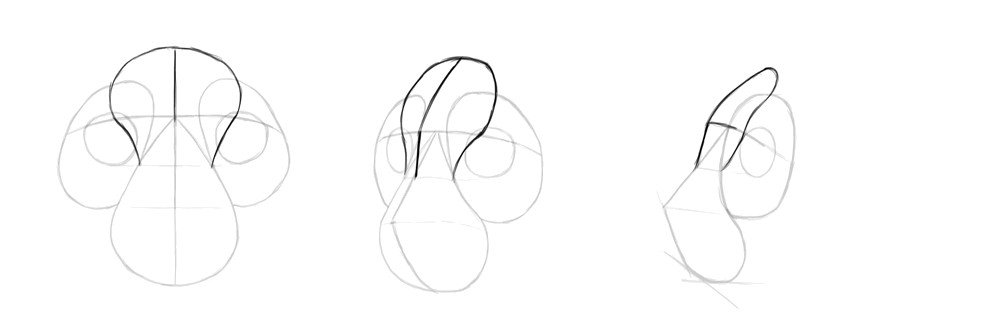 Adding forehead to cat head drawing
Sketch the jawlines…
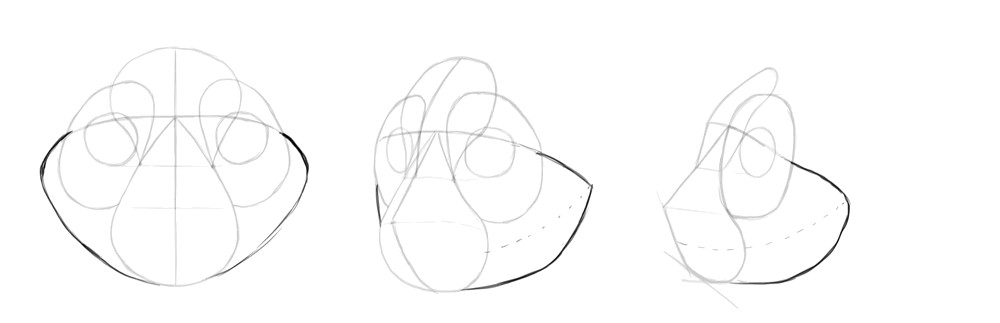 Drawing jawline for cat head
…and then complete the outline of the skull.
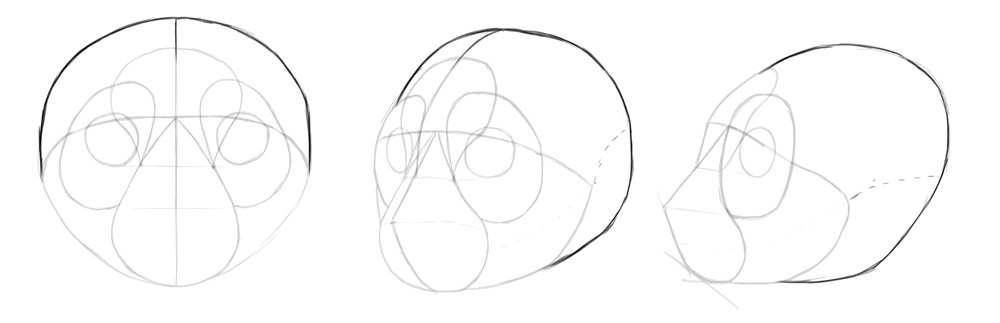 Completing skull outline for cat head drawing
With these guidelines in place, you have a solid foundation for adding finer details:
 Adding details to cat head drawing – mouth and chin
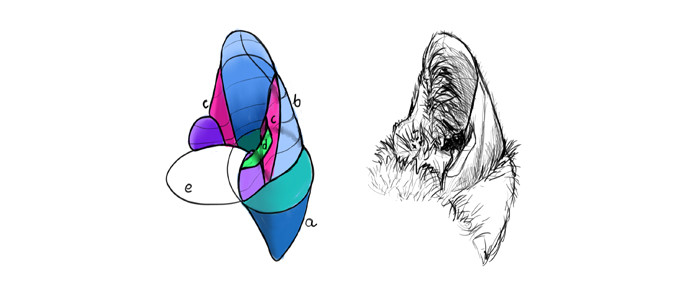
Cat ears are intricate structures, challenging to draw and visualize in three dimensions. Simplifying them to basic forms is difficult, but breaking them down into components can help: a base (a), a “roll” or “horse ear” shape (b), two sets of flaps (c), a pouch (d), and the “front yard” area (e). Even when obscured by fur, these elements define the ear’s shape.
 Anatomy breakdown of a cat's ear for drawing
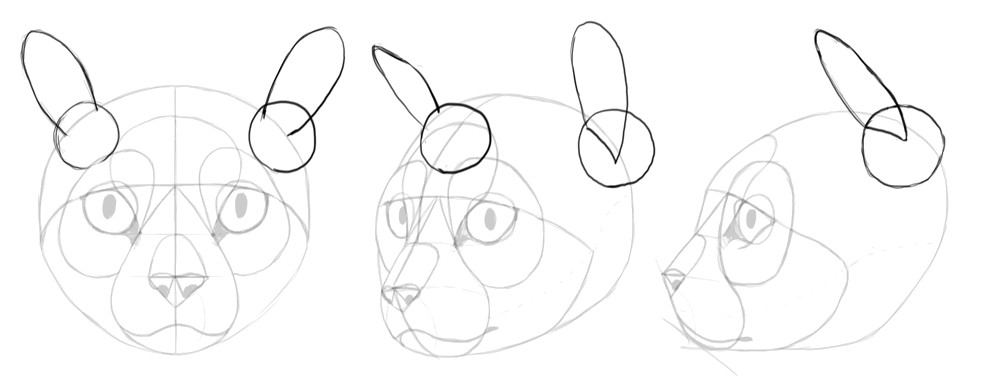
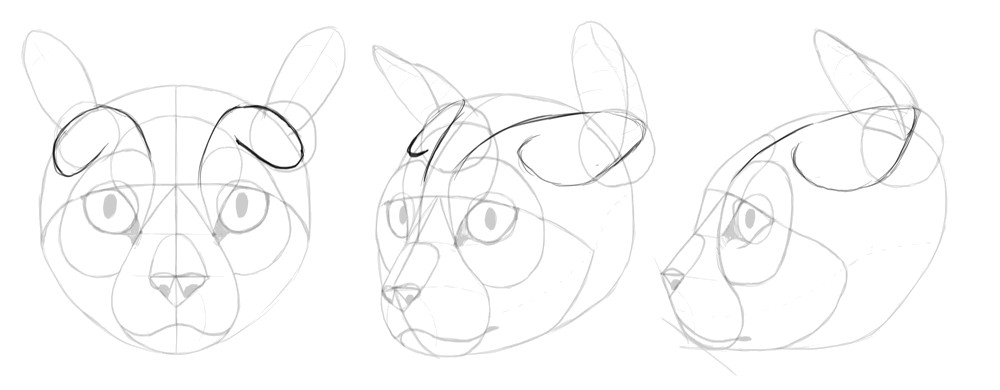
Let’s draw them step-by-step: Begin by sketching a spherical base and the ear opening. This establishes their positioning and length.
 Step 1: Drawing ear base and opening for cat head
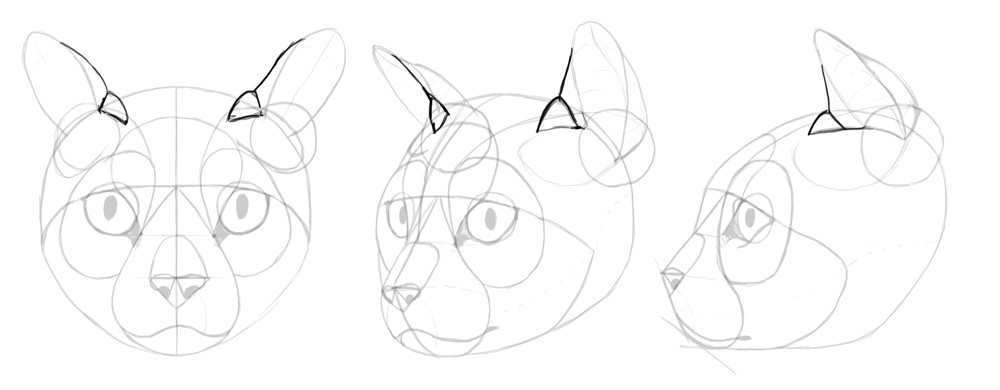
Add depth to the ear by drawing a shape resembling a partially rolled leaf. If visualizing this in 3D is challenging, practicing perspective and form drawing might be beneficial.
 Step 2: Adding depth to cat ear drawing
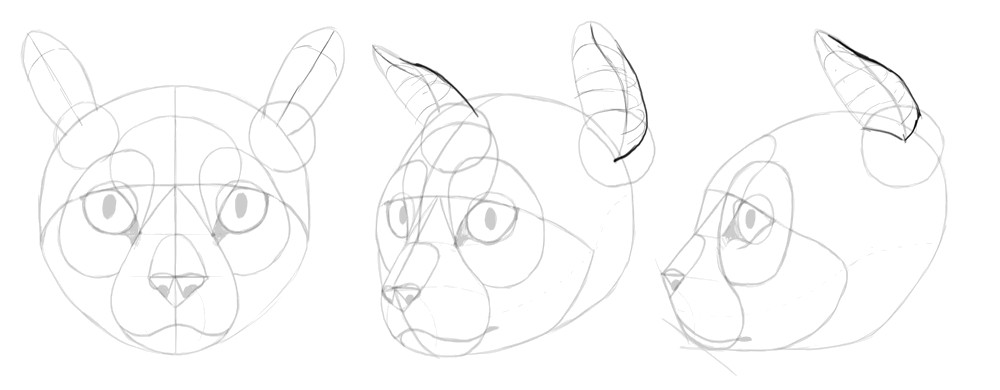
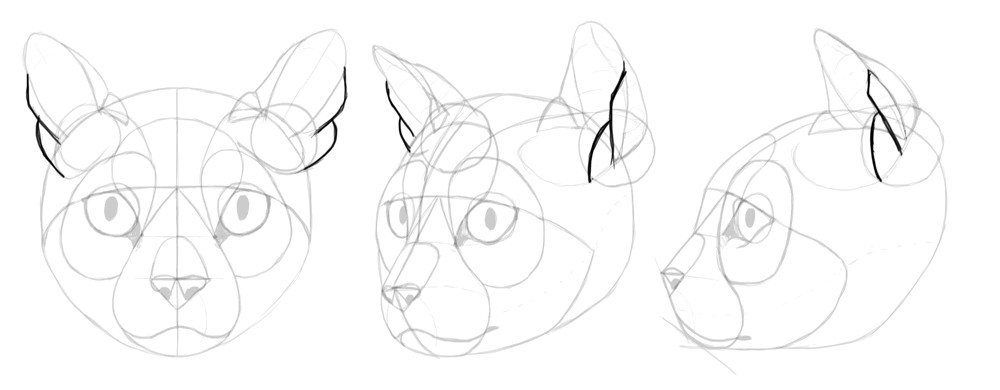
Define the “front yard” area, located between the ear and the eyes.
 Step 3: Defining front yard area of cat ear
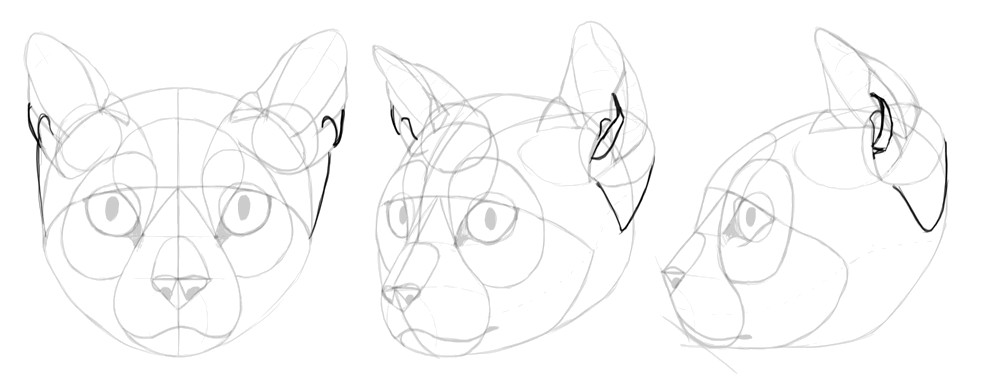
Add the flaps. Perspective is crucial here to ensure they appear correctly oriented in space!
 Step 4: Adding flaps to cat ear drawing – perspective
 Step 5: Completing flaps on cat ear drawing
Finally, complete the ear base and add the small pouch that covers the outer flaps.
 Step 6: Finalizing cat ear drawing with base and pouch
This process results in a generic cat head, which you can then adapt to create specific breeds by modifying proportions and features.
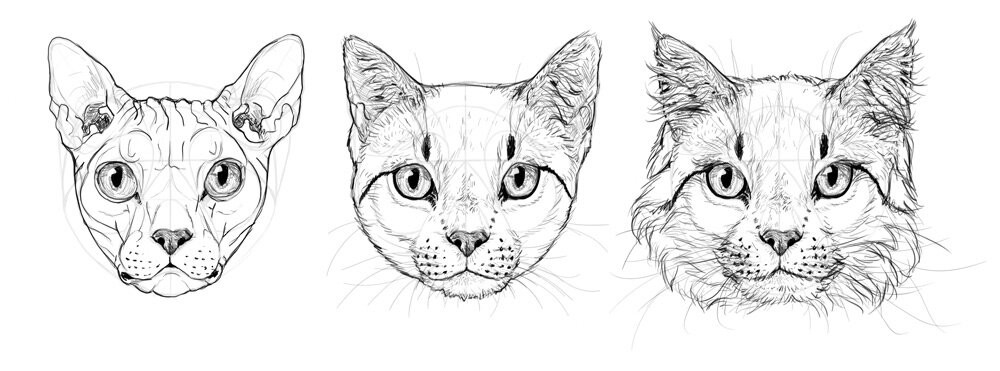 Step-by-step guide to drawing a cat head
Let’s integrate heads into our earlier sketches:
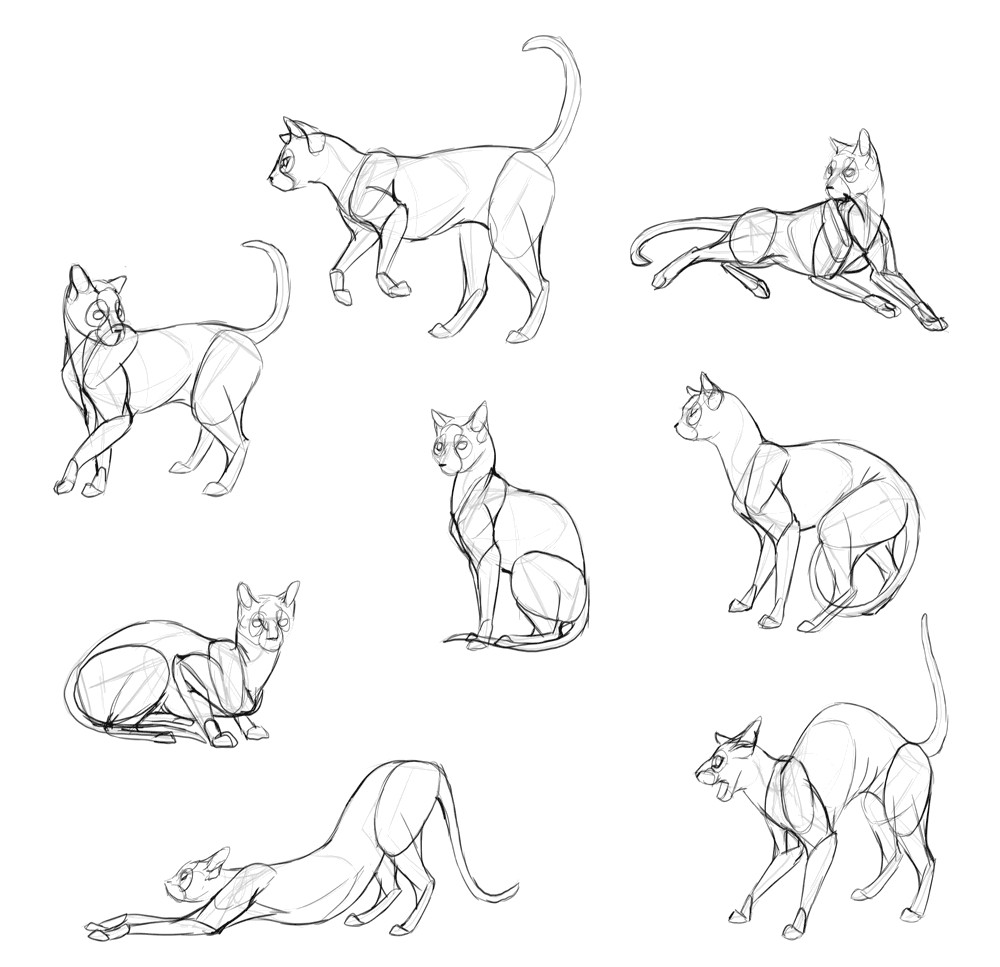 Cat sketches with heads added – ear importanceMonika’s quick sketches with heads, highlighting the significance of ear placement and shape.
Drawing Realistic Cat Paws: A Detailed Approach
Cat paws are uniquely charming, concealing formidable claws within soft, fluffy pads. This fluffiness, again, makes them relatively forgiving and easier to draw. Let’s explore how! A typical cat forepaw has five digits, but only four are weight-bearing during walking. The fifth digit (a), known as the dew claw, is analogous to a human thumb and is positioned higher on the leg, typically not touching the ground. Each digit has a pad underneath, similar to human fingertips. Additionally, there’s a carpal pad called the pisiform (b) located further back on the paw. You can feel the corresponding bone on the outer side of your wrist—in humans, it’s not covered by a pad.
Hind paws differ, having only four toes and lacking the pisiform pad.
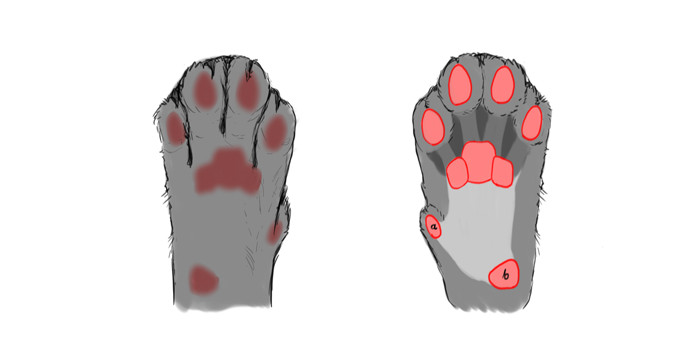 Anatomy of cat paws for drawing reference
You can begin sketching paws concurrently with the skeleton. Imagine them as wire-like structures that must support the cat’s weight.
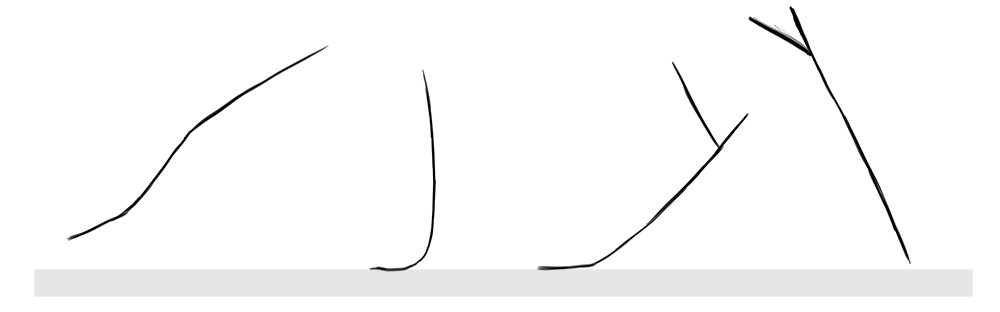 Drawing cat paws as wireframe on skeleton
Sketch the fundamental shape of each paw. Note that the 3D perspective view (c) is a fusion of the 2D views (a, b).
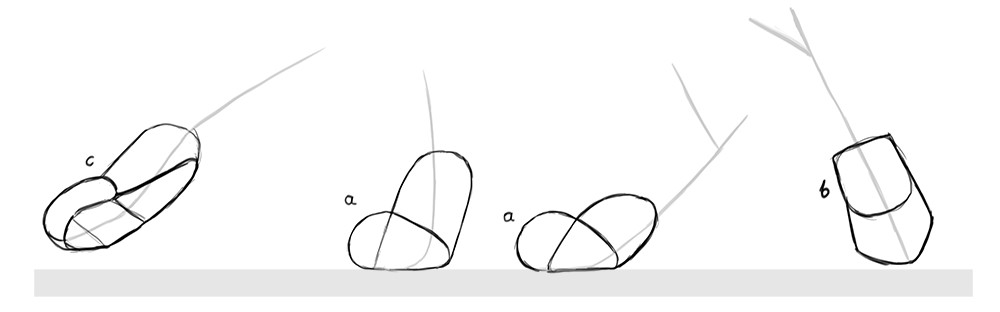 Basic paw shapes for drawing cats
Add the outlines of individual fingers and toes. Remember to include the dew claws on the forepaws, positioned like thumbs.
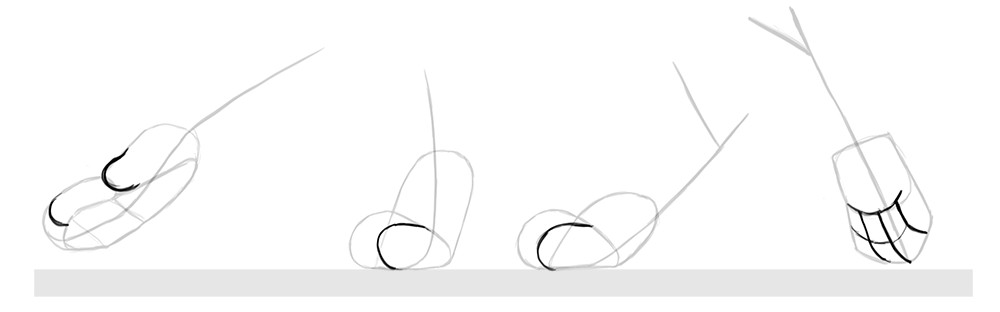 Adding finger and toe outlines to cat paw drawing
For short-haired cats, you can add oval shapes at the front of the fingers and toes to accentuate the underlying bone structure. Also, don’t forget to include the pads, if visible, and the pisiform pad on the back of the forepaws!
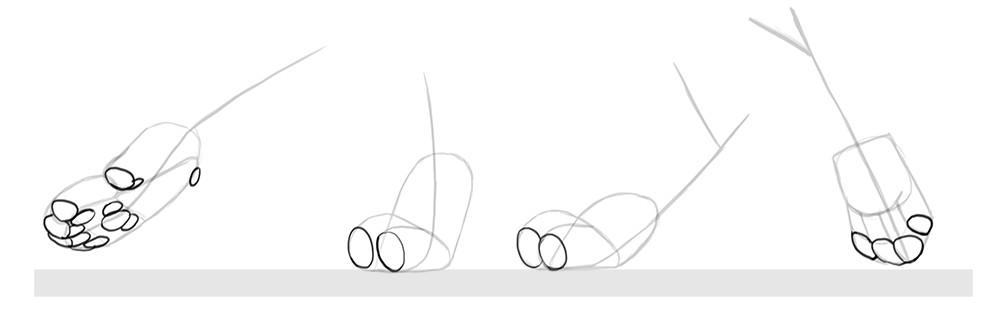 Detailing fingers, toes, and pads on cat paw drawing
Finally, refine the overall outline of the paws. In short-haired breeds, the tips of the claws on the hind paws are often visible, which can be added as a subtle detail.
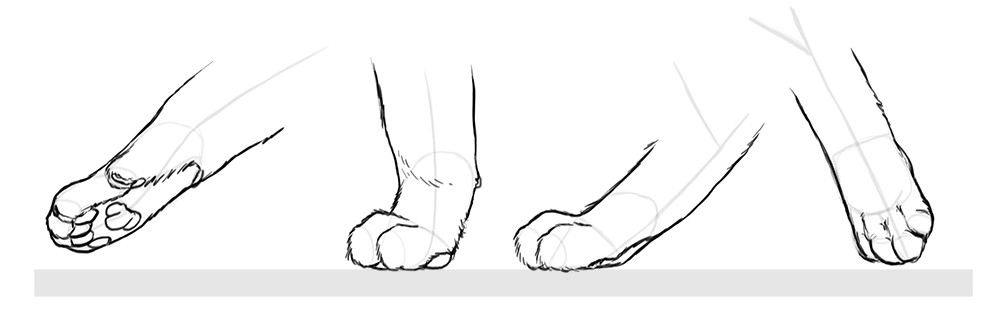 Finalizing cat paw outline with claw details
Adding Fur to Complete Your Cat Drawing
Once you’ve sketched the pose and anatomical structure, you can bring your cat drawing to life by adding fur. The length and texture of the fur significantly impact the perceived volume of the body. Longer fur will make body parts appear bulkier. Always consider the direction of hair growth across the body to create a natural and realistic fur texture. Remember the “one-piece pajama” concept – fur conforms to the underlying form while adding softness and volume.
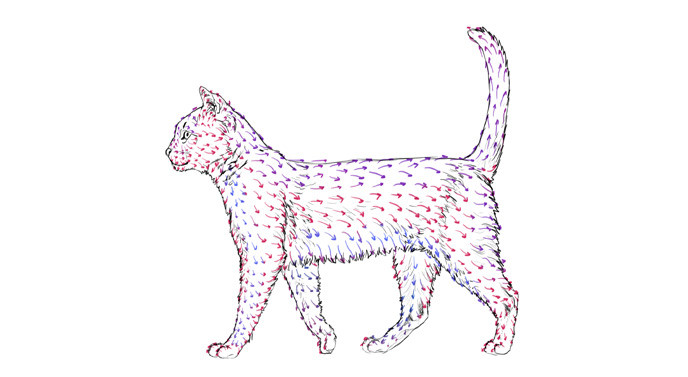 Direction of cat hair growth for drawing fur
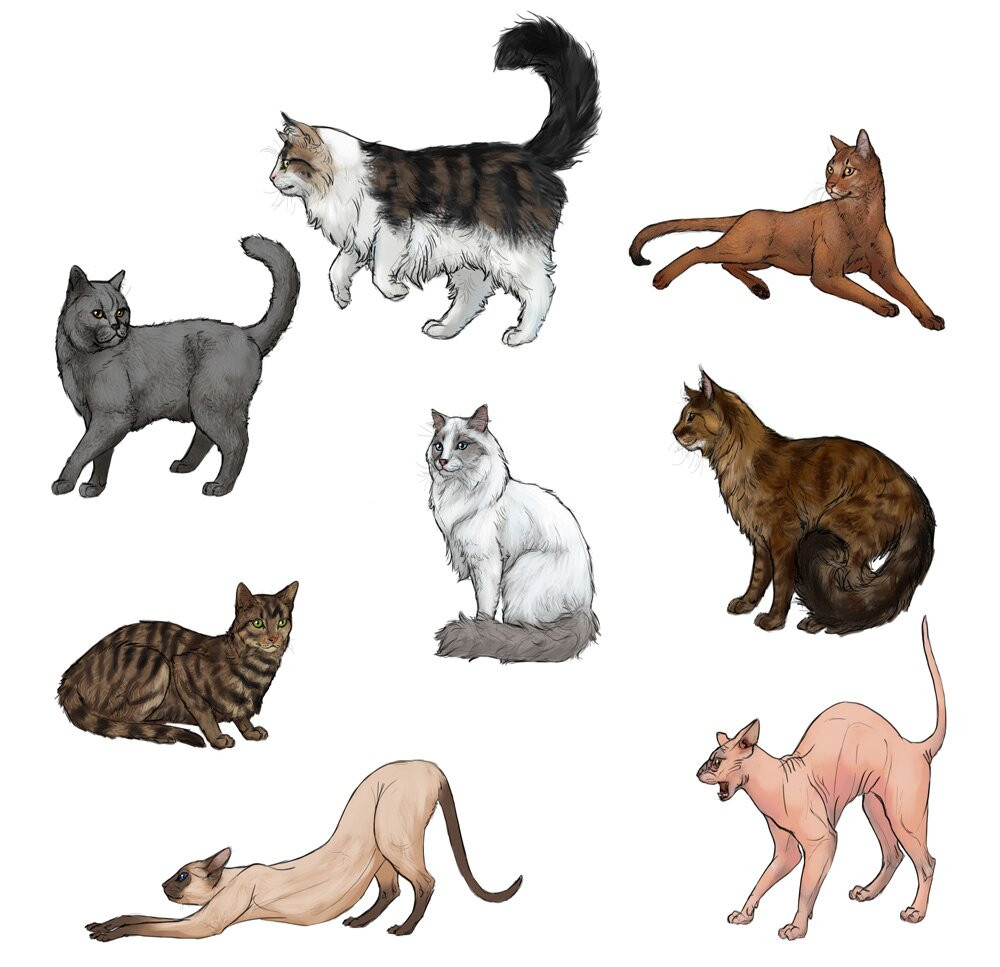
Before drawing a specific cat breed, take time to study reference images. Analyze how the breed’s characteristics influence facial proportions, fur length, leg length, and tail shape. While capturing every minute detail isn’t necessary, highlighting key breed-specific traits is crucial for recognition.