Across neighborhoods and communities, countless cats live outdoors, skillfully navigating their environment. These resilient community cats are well-adapted to outdoor living, yet they still need our help, especially when harsh weather arrives. As temperatures drop and storms brew, providing a Weatherproof Outdoor Cat Shelter becomes crucial for their safety and comfort.
Just like millions of compassionate individuals, you can make a significant difference in the lives of these feline friends. Constructing a weatherproof outdoor cat shelter offers them a sanctuary – a place to rest, escape the elements, and stay warm and secure. The best part? Building a durable weatherproof outdoor cat shelter is an easy and affordable DIY project that will be greatly appreciated by your neighborhood cats!
Here’s a step-by-step guide to create a weatherproof outdoor cat shelter, ensuring it stands up to the elements and keeps cats cozy:
For a visual guide, you can also watch this helpful video: Cat Tips: DIY Outdoor Cat Shelter on YouTube.
Materials You’ll Need for a Weatherproof Shelter
To build a robust weatherproof outdoor cat shelter, gather these readily available and affordable materials:
- Large Plastic Tub (approximately 30 gallons) with lid: This will serve as the main body of the weatherproof outdoor cat shelter. Choose a dark color to absorb solar heat, adding extra warmth. The plastic is naturally water-resistant, crucial for a weatherproof design.
- Smaller Plastic Tub (approximately 20 gallons) with lid: This tub will create an insulated inner chamber within the larger tub, providing enhanced weatherproofing and warmth.
- Box Cutter or Utility Knife: Essential for safely cutting plastic to create entrances.
- Permanent Marker: For marking cut lines on the plastic tubs.
- Scissors: For trimming straw if necessary.
- Hair Dryer (or Heat Gun on low setting): To soften plastic for easier and safer cutting.
- Thin Slab of Styrofoam Insulation: This layer goes at the bottom of the shelter, adding vital insulation from the cold ground and enhancing the weatherproof nature by preventing ground moisture from seeping in.
- Plastic Flowerpot (Non-tapering): This will be transformed into a tunnel entrance, offering additional protection from wind and rain, making the shelter more weatherproof.
- Straw (NOT Hay): Crucial bedding material. Straw is superior to hay for weatherproof outdoor cat shelters because it repels moisture and stays dry, providing insulation even in damp conditions. Hay, on the other hand, absorbs moisture and can become moldy, which is detrimental to the shelter’s weatherproof qualities and the cats’ health.
Step-by-Step Guide to Constructing Your Weatherproof Cat Shelter
Follow these detailed steps to assemble your weatherproof outdoor cat shelter:
-
Mark the Entrance on the Outer Tub: Place the plastic flowerpot against the side of the larger tub where you want the entrance to be. Use the permanent marker to trace the flowerpot’s opening onto the tub, outlining the entrance of your weatherproof outdoor cat shelter.
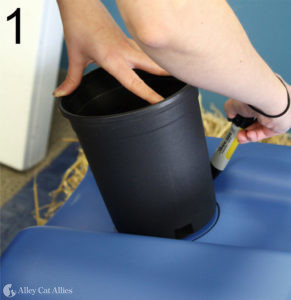 Marking entrance on large tub for weatherproof cat shelter
 -
Soften the Plastic for Cutting: Using the hair dryer on a medium setting, gently warm the plastic along the marked outline. Heating the plastic makes it significantly easier and safer to cut, reducing the risk of cracking and ensuring a cleaner entrance for your weatherproof outdoor cat shelter.
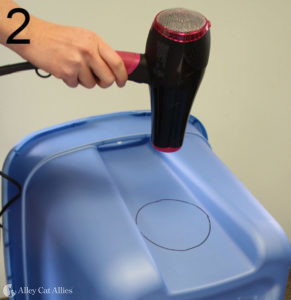 Softening plastic with hairdryer for weatherproof cat shelter entrance
 -
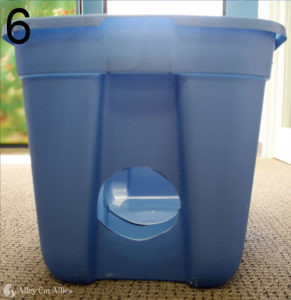
Cut the Entrance of the Outer Tub: Carefully use the box cutter to cut along the softened outline, creating the entrance in the larger tub. Work slowly and cautiously to avoid injury. This opening is the main access point to your weatherproof outdoor cat shelter, so ensure it’s smooth and cat-friendly.
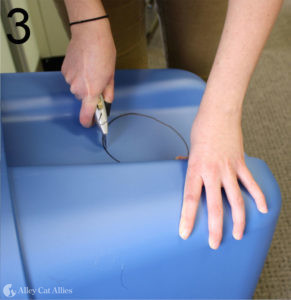 Cutting entrance of large tub for weatherproof cat shelter
 -
Prepare the Base Insulation: Place the thin slab of Styrofoam insulation into the bottom of the large tub. This insulating base is critical for a weatherproof outdoor cat shelter, as it prevents cold from the ground from penetrating the shelter and keeps the interior warmer and drier. Next, position the smaller tub inside the larger tub, resting on top of the Styrofoam.
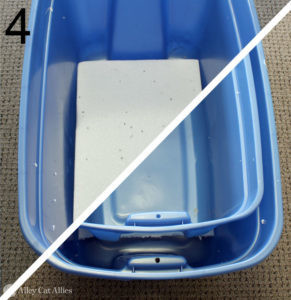 Placing styrofoam and small tub inside large tub for weatherproof cat shelter
 -
Mark the Inner Tub Entrance: Align the smaller tub within the larger one, ensuring the entrances will match up. Use the entrance you’ve already cut in the larger tub as a template to mark the entrance location on the smaller tub. This ensures a consistent tunnel entrance through both layers of your weatherproof outdoor cat shelter.
 Marking entrance on small tub using large tub entrance as template for weatherproof cat shelter
 -
Cut the Entrance of the Inner Tub: Repeat steps 2 and 3 for the smaller tub, softening the plastic outline with the hair dryer and then carefully cutting out the entrance. Creating matching entrances in both tubs is key to the double-walled insulation of this weatherproof outdoor cat shelter.
 Cutting entrance of small tub for weatherproof cat shelter
 -
Insulate the Shelter Walls with Straw: Place the smaller tub inside the larger tub. Pack the space between the two tubs’ walls generously with straw. Straw is vital for insulating your weatherproof outdoor cat shelter, trapping warmth and further preventing moisture buildup. Remember, use straw, not hay, for optimal weatherproofing.
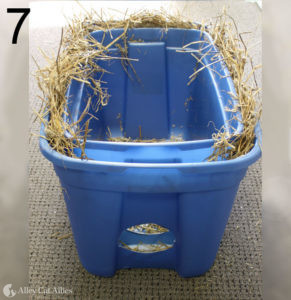 Adding straw insulation between tubs for weatherproof cat shelter
 -
Create Cozy Bedding: Fill the inner, smaller tub with a generous amount of loose straw. This straw will serve as comfortable and insulating bedding for the cats, completing the interior of your weatherproof outdoor cat shelter. Ensure it’s fluffy and inviting.
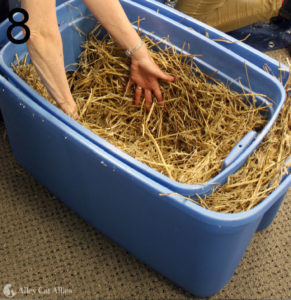 Filling inner tub with straw bedding for weatherproof cat shelter
 -
Construct the Tunnel Entrance: Cut off the bottom of the plastic flowerpot to create a tunnel. Slide this flowerpot tunnel into the aligned entrances of both the large and small tubs. You might need to trim the plastic entrances slightly to ensure a snug fit. This tunnel entrance is a crucial weatherproof feature, acting as a baffle to block wind, rain, and snow from directly entering the shelter, while still allowing cats easy access.
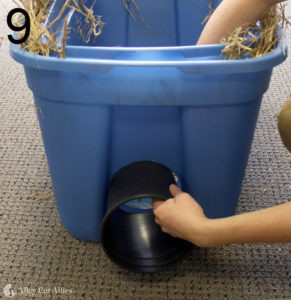 Creating tunnel entrance with flowerpot for weatherproof cat shelter
 -
Secure the Lids: Place the lids securely on both the inner and outer tubs. The lids are essential for a truly weatherproof outdoor cat shelter, protecting the interior from rain and snow. Ensure they are firmly in place to maintain the shelter’s integrity against the elements.
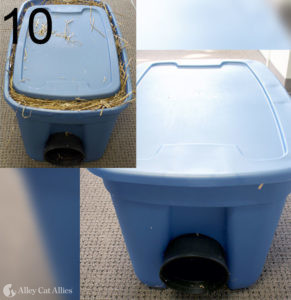 Securing lids on tubs for weatherproof cat shelter
Your DIY weatherproof outdoor cat shelter is now complete and ready to offer refuge to community cats!
This double-tub design is just one effective method for creating weatherproof outdoor cat shelters. For more ideas and options, including pre-built shelters, visit alleycat.org/ShelterGallery.
Alley Cat Allies, founded in 1990, is dedicated to protecting and improving the lives of all cats. Learn more about their vital work and how you can support their mission at www.alleycat.org. Connect with them on social media: Facebook, X (Twitter), Instagram, LinkedIn, and YouTube.