
The Cat Of 9 Tails, a type of flogger or whip, has a history steeped in nautical tradition and discipline. Often referred to as “the captain’s daughter” in maritime circles, this tool was historically used for enforcing order aboard ships. While its original purpose was disciplinary, the cat of 9 tails has found contemporary relevance in various communities, including those interested in BDSM practices. This guide will walk you through crafting your very own cat of 9 tails using paracord, offering a rewarding DIY project.
What is a Cat of 9 Tails?
The name “cat of 9 tails” itself refers to the distinctive design featuring nine tails or strands. This number is not arbitrary; it’s rooted in practicality. Traditionally, three standard, 3-strand ropes could be unraveled to create precisely nine individual tails. This design amplified the sting and impact compared to a single whip. While historically a tool for punishment, modern interpretations often focus on consensual and controlled use within specific subcultures.
 paracord-550-cat-of-nine-tails
Supplies You’ll Need to Make a Paracord Cat of 9 Tails
To embark on this crafting journey and create your own paracord cat of 9 tails flogger, gather these essential supplies:
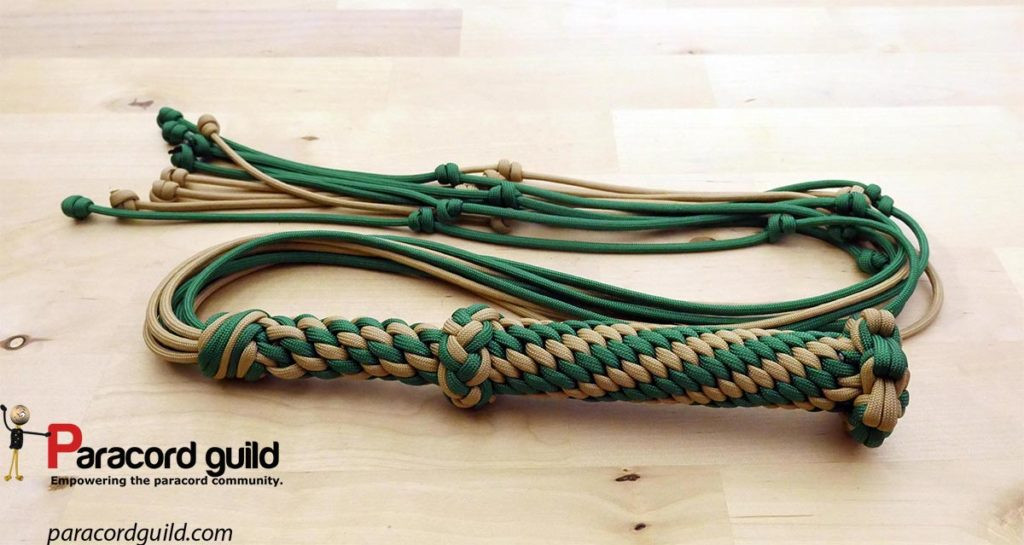
- Paracord 550: You’ll need 9 pieces, each approximately 7.5 feet (230 cm) long. Feel free to use a single color for a uniform look or mix colors for a more vibrant and personalized cat of nine tails.
- Handle Core: A solid, two-part core is recommended for a sturdy handle.
- Main Core: A metal rod (brass or aluminum) about 8 inches long and 1/8 inch in diameter will form the primary structure of the handle.
- Outer Core: A hollow piece, roughly 5 inches long and 1/2 inch in diameter, that slides over the main core to add thickness and substance to the handle.
- Lacing Needle: This tool is invaluable for neatly finishing knots and tucking in paracord ends.
- Scissors and Lighter: Essential for cutting paracord and sealing the ends to prevent fraying.
Step-by-Step Guide: How to Craft a Paracord Cat of 9 Tails
Now, let’s delve into the process of making your paracord cat of 9 tails. This detailed guide, inspired by a design from Des Pawson’s knotting expertise, will lead you through each step.
Preparing the Paracord and Core
- Measure and Mark: Take your 9 pieces of paracord and measure 3 feet from one end. Secure these pieces together at the 3-foot mark using a piece of thread. These longer sections will become the tails of your flogger.
Knotting the Handle – Matthew Walker and Crown Sinnets
- Matthew Walker Knot: Begin by tying a 9-strand Matthew Walker knot at the point where you secured the paracord with thread. This knot forms the base of the handle. Practice is key for a neat Matthew Walker knot, so don’t be discouraged if your first attempt isn’t perfect. Gradually dress the knot to tighten and shape it.
- Alternate Crown Sinnet: Start an alternate crown sinnet using 8 of the paracord strands, incorporating the ninth strand as the core. After completing two crown knots, insert your main, 8-inch core alongside the core strand, pushing it into the initial crown knots. Continue tying about 3 inches of alternate crown knots to secure the core.
- Double Diamond Knot Transition: Create a smooth transition to a thicker crown sinnet with a double diamond knot. Double the strands on the inner side of the knot for added bulk.
Creating the Star Knot Finish
- Hollow Core and Crown Sinnet: Slide your second, hollow core piece (approximately 5 inches long) over the core strand and the main core. You can thread the core strand through the hollow core a few times to ensure a snug fit, preventing the inner core from rattling. Use a lacing needle to assist with this step.
- Regular Crown Sinnet: Continue with a regular 8-strand crown sinnet for about 5 inches over the hollow core, building up the handle’s thickness.
- Handle End Closure: Finish the handle end with two alternate crown knots for a clean and secure closure.
- Star Knot Decoration: Decorate the very end of the handle with an 8-strand star knot.
- Final Knotting and Securing: Crown the ends of the star knot and then double the crown knot by threading the strands back through the star knot, concealing the ends on the underside. Use the lacing needle to help tuck the strands neatly. Finally, trim and melt the paracord ends as close to the star knot as possible for a clean finish.
Crafting the Tails
- Blood Knots for Tails: The 3-foot sections of paracord that you initially marked will now become the tails. Decorate the ends of each tail with blood knots (double overhand knots) to add weight and visual appeal.
Finishing Touches
- Sinnet Straightening: To even out the crown sinnets on the handle, roll them firmly between two flat planks of wood.
- Star Knot Stiffening: To stiffen the star knot at the handle’s base, briefly submerge it in boiling water for about a minute or carefully apply heat using a heat gun or lighter, being cautious not to burn or melt the paracord.
 paracord-cat-o-nine
Conclusion: You’ve Made Your Own Cat of 9 Tails!
Creating a cat of 9 tails from paracord is a testament to patience and craftsmanship. If you’ve followed these steps and completed your project, congratulations! You’ve successfully crafted your own paracord flogger. Feel free to personalize your design further by experimenting with different knotting techniques, color combinations, and handle finishes to create a truly unique cat of 9 tails. This DIY project not only results in a handcrafted item but also provides a fulfilling experience in knot tying and paracord artistry.