
Creating a special space for your feline friend doesn’t have to break the bank. Thrift stores are treasure troves for unique items that, with a dash of creativity, can be transformed into amazing kitty havens. If you’re looking for a personalized touch beyond standard pet store offerings and want to explore options similar in comfort to even the best Chewy Cat Beds, DIY projects are the purrfect solution. I’ve always loved the thrill of upcycling thrift store finds into cozy cat creations, but a vintage suitcase bed was one project I hadn’t yet tackled. When I stumbled upon this charming old suitcase at a thrift store, inspiration struck. (Of course, if DIY isn’t your style, there’s a wide selection of fantastic cat beds readily available).
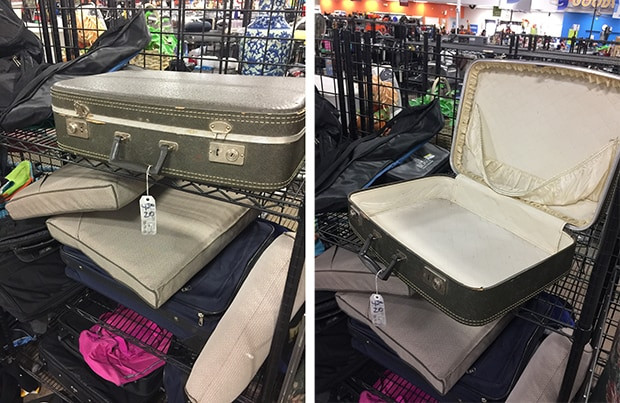 Vintage suitcase cat bed project start, showcasing a worn brown suitcase, hinting at its transformation into a cozy cat bed.
This suitcase find was particularly exciting. Its charmingly worn exterior and a slightly broken latch gave it character, making it the ideal candidate for a repurposed project without any guilt. And the price? Just $6.99! A true score. My next stop was the hardware store, where I sought out small legs to elevate the bed slightly. This detail offers endless creative possibilities – metal, wood, plastic, modern, classic, brightly painted – the styles are limitless! I opted for simple, understated wood and metal legs. Along with the legs, I gathered the necessary hardware to securely attach them to the suitcase base. With these key components secured, I assembled the remaining supplies needed to bring this unique cat bed to life.
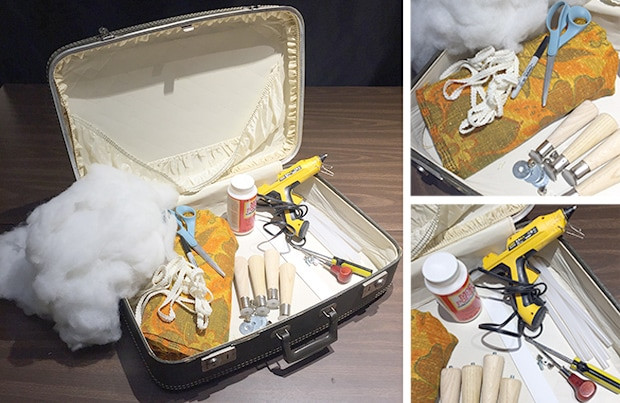 DIY vintage cat bed materials laid out, featuring a suitcase, fabric, legs, pillow, tools, and Mod Podge, ready for crafting a cozy pet bed.
Essential Supplies for Your Thrifted DIY Cat Bed
- Vintage Suitcase: The foundation of your unique cat bed.
- Legs and Hardware: To raise the bed and add style (consider furniture legs from a hardware store).
- Fabric: Choose a cozy fabric to create a pillow cover and line the suitcase lid, ensuring comfort akin to premium chewy cat beds.
- Pillow or Polyfill: For creating a plush and inviting bed. Pre-made pillows or polyfill stuffing work equally well.
- Decorative Trim: To add a polished and professional finish.
- Mod Podge & Brush: For adhering fabric smoothly and sealing edges.
- Hot Glue Gun & Glue Sticks: For secure and quick bonding of trim and details.
- Thin Wood or Plastic Strip & Hardware: To fashion a lid support, keeping it safely open.
- Awl: For easily creating pilot holes for leg attachments.
- Scissors: For precise fabric and trim cutting.
- Pen or Pencil: For marking measurements and guidelines.
- Screwdriver: To tighten screws for leg and hardware assembly.
- Electric Drill with Drill Bits: For creating clean and accurate holes.
- Utility Knife: For trimming fabric and detailing work.
Step-by-Step Guide to Crafting Your DIY Cat Bed
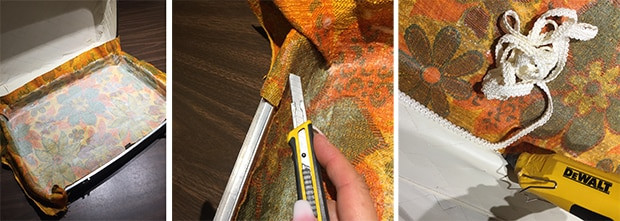
The original lining inside the suitcase lid was showing its age. If you’re fortunate to find a suitcase with pristine lining, especially one with pockets (perfect for stashing cat toys!), you might choose to leave it untouched. However, in this case, the worn lining had to go. I carefully removed it, cleaning the lid’s interior as thoroughly as possible.
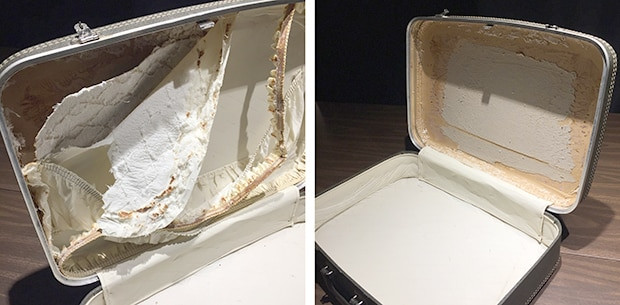 Removing old lining from the vintage suitcase lid in preparation for fabric lining, showcasing the initial step in the DIY cat bed project.
Next, measure and cut a piece of fabric large enough to generously cover the entire inside of the suitcase lid, allowing for a slight overlap around the edges. Pour a substantial amount of Mod Podge directly into the lid. Using a brush, spread the Mod Podge evenly across all interior surfaces where the fabric will adhere, ensuring a smooth and consistent layer.
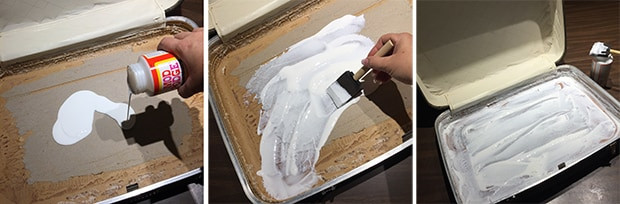 Applying Mod Podge to the inside of the suitcase lid, preparing the surface for fabric lining in the DIY cat bed creation process.
Carefully press the fabric onto the Mod Podge-coated interior of the lid. Smooth out any wrinkles or trapped air bubbles to ensure a seamless finish. Once the fabric is smoothly in place, apply another layer of Mod Podge over the fabric. Brush it out into a thin, even coat. This seals the fabric and provides durability, much like the materials used in durable chewy cat beds.
 Smoothing fabric onto the Mod Podge-covered suitcase lid, ensuring a wrinkle-free lining for the DIY cat bed project.
Allow the Mod Podge ample time to dry completely. Then, using a sharp utility knife, carefully trim away the excess fabric extending beyond the edges of the lid. Finally, use a hot glue gun to apply decorative trim around the entire inside edge of the lid, directly over the trimmed fabric edge. This adds a refined, clean look and prevents the fabric edges from fraying over time, enhancing the bed’s longevity.
 Applying decorative trim to the fabric-lined suitcase lid, adding a finishing touch to the DIY cat bed and preventing fabric fraying.
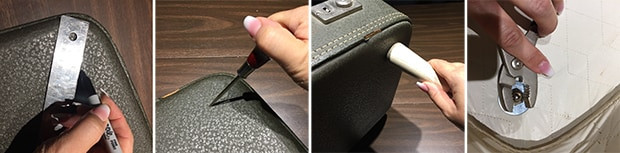
Now, it’s time to attach the legs. First, determine the desired leg placement on the bottom of the suitcase. Mark these locations clearly. Using the awl, carefully poke pilot holes through the suitcase at each marked point. For legs that come with threaded bolts, like the ones I used, insert the bolt through the hole from the outside. Inside the suitcase, secure each leg using a large washer and a cap nut to fully cover the bolt’s end. It’s crucial to ensure there are no exposed sharp points inside the bed for your cat’s safety and comfort, mirroring the safety standards of commercial chewy cat beds.
 Attaching furniture legs to the base of the suitcase, elevating the DIY cat bed and adding a stylish design element.
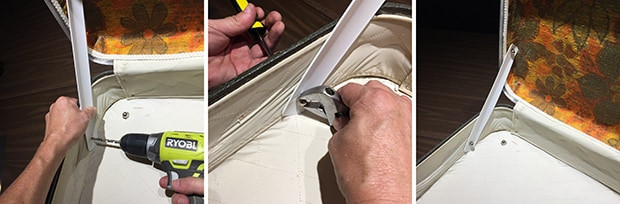
To prevent the suitcase lid from accidentally closing while your cat is enjoying their new bed, it’s essential to install a support to hold the lid open. I used a thin strip of plastic trim for this purpose. Drill a hole through both the plastic trim and the suitcase side. Attach the trim to the suitcase using a bolt and cap nut, creating a hinge-like support. Important Note: Depending on the suitcase dimensions and the style of legs you choose, the finished bed might become slightly top-heavy and potentially tip. If you encounter this, add weight beneath the pillow, such as a heavy book or a small sandbag, to enhance stability. Alternatively, position the back of the bed against a wall for added support and peace of mind. The final step is creating a comfortable pillow that perfectly fits inside the suitcase base. If sewing isn’t your forte, a pre-made pillow that fits the dimensions will work wonderfully; simply add a decorative pillowcase to match your style.
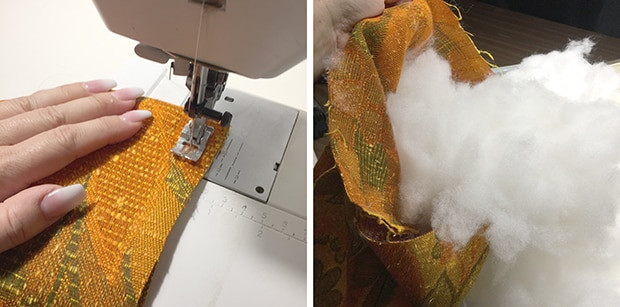 Creating a plush pillow for the DIY cat bed, adding a layer of comfort comparable to high-quality, soft chewy cat beds.
This DIY project is a fantastic canvas for your personal creativity. Experiment with different fabrics for both the pillow and the suitcase lining. Incorporate more elaborate trims, or even consider painting the exterior of the suitcase to match your home décor or your cat’s personality.
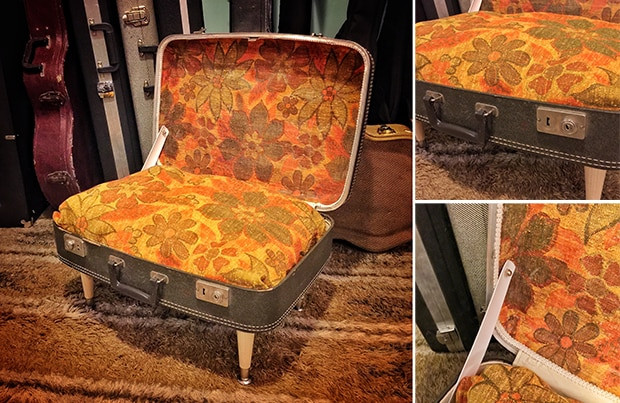 Finished DIY vintage suitcase cat bed, showcasing the completed cozy and stylish pet bed ready for feline enjoyment.
You can also adapt this project using other unique thrift store finds, such as an old guitar case for a musical feline friend’s retreat! Embrace the fun and personalization that DIY offers.
Kate Benjamin is the founder of Hauspanther and co-author with Jackson Galaxy of New York Times bestsellers “Catification” and “Catify to Satisfy.” Kate is an expert in creating stylish and cat-friendly homes.
Share: