Ever wanted to create something special for your feline friend that will bring them endless joy? Look no further! This guide will walk you through crafting your very own Stuffed Cat Toy infused with irresistible catnip. Not only is this a fun and rewarding DIY project, but it also offers a personalized touch to your cat’s playtime. Inspired by a heartwarming story of a beloved cat named Wido Piddy, we embarked on a journey to create the perfect homemade toy. Get ready to unleash your creativity and spoil your kitty with a stuffed cat toy they’ll adore!
Wido Piddy, a petite cat with a kitten-like charm even in her golden years, served as the muse for this project. Living a comfortable life in a woodworking shop, she started experiencing excessive grooming. To provide her with comfort and enrichment, the idea of a DIY stuffed cat toy filled with calming catnip was born. After some initial crafting experiments, we landed on a delightful and easy-to-make fish-shaped design.
Let’s explore the journey of creating this purr-fect stuffed cat toy, including the initial learning curves and the triumphant final version. If you’re eager to get straight to the winning design, feel free to jump to “DIY Cat Toy Version Three.”
DIY Cat Toy Version One: The Cowboy Catnip Pouch
Our first attempt at a stuffed cat toy involved using scrap cowboy-themed fabric – a fun, patterned cotton that was readily available. The idea was to create a unique shape using fusible interfacing for added durability.
Supplies:
- Scrap Fabric (Cotton Recommended)
- Fusible Interfacing
- Thread
- Catnip (10-20 grams)
- Sewing Machine (optional, hand sewing works too)
- Needle
- Scissors
Steps:
- Shape Cutting: We cut out a cowboy motif from the fabric, ensuring a half-inch seam allowance. A matching shape was cut from plain cotton for the back, along with two interfacing pieces to provide structure.
- Interfacing Application: Following the manufacturer’s instructions, the fusible interfacing was ironed onto the fabric pieces. The aim was to make the stuffed cat toy more resistant to enthusiastic play.
- Sewing: With right sides facing, the fabric pieces were pinned and sewn together, maintaining a half-inch seam allowance. A small opening was left for turning and stuffing.
- Edge Snipping: Curves around the cowboy shape were snipped to allow for smoother shaping once turned right side out.
- Turning and Stuffing: Turning the small, interfaced cowboy shape right side out proved to be quite challenging. The stiffness of the interfacing and the intricate shape made it a bit of a struggle. A spoon was helpful in pushing out the seams. Once turned, the toy was generously filled with catnip, ensuring it reached all parts of the shape.
- Closing: The opening was hand-sewn closed, completing the first version of the DIY stuffed cat toy.
Lessons Learned: Complex shapes and interfacing can make turning and stuffing small toys difficult. For a truly easy DIY experience, simpler shapes are better.
DIY Cat Toy Version Two: The Mouse (or Parsnip?) Mishap
For the second attempt, the goal was simplicity. We opted for a basic “mouse” shape and skipped the interfacing to make the sewing and turning process easier for this stuffed cat toy.
Supplies:
- Scrap Fabric (Cotton)
- Thread
- Catnip (10-20 grams)
- Sewing Machine
- Needle
- Scissors
Steps:
- Simple Shape: A freehand mouse-like shape was cut from cotton fabric. Two layers were cut for the front and back of the toy.
- Sewing and Turning: The edges were sewn together, leaving an opening. Turning this simpler shape right side out was noticeably easier than the cowboy.
- Stuffing and Debate: The toy was stuffed with catnip. However, its appearance sparked a humorous debate – was it a mouse, a rat, or even a parsnip?
Then came the creative additions to solidify its identity as a mouse. A braided string tail, whiskers, and beady eyes were added to resolve the ambiguity.
Lessons Learned: While simpler shapes are easier to work with, the choice of material and even simpler construction could further enhance the DIY stuffed cat toy making experience. Also, sometimes, even with the best intentions, DIY projects can take unexpected, funny turns!
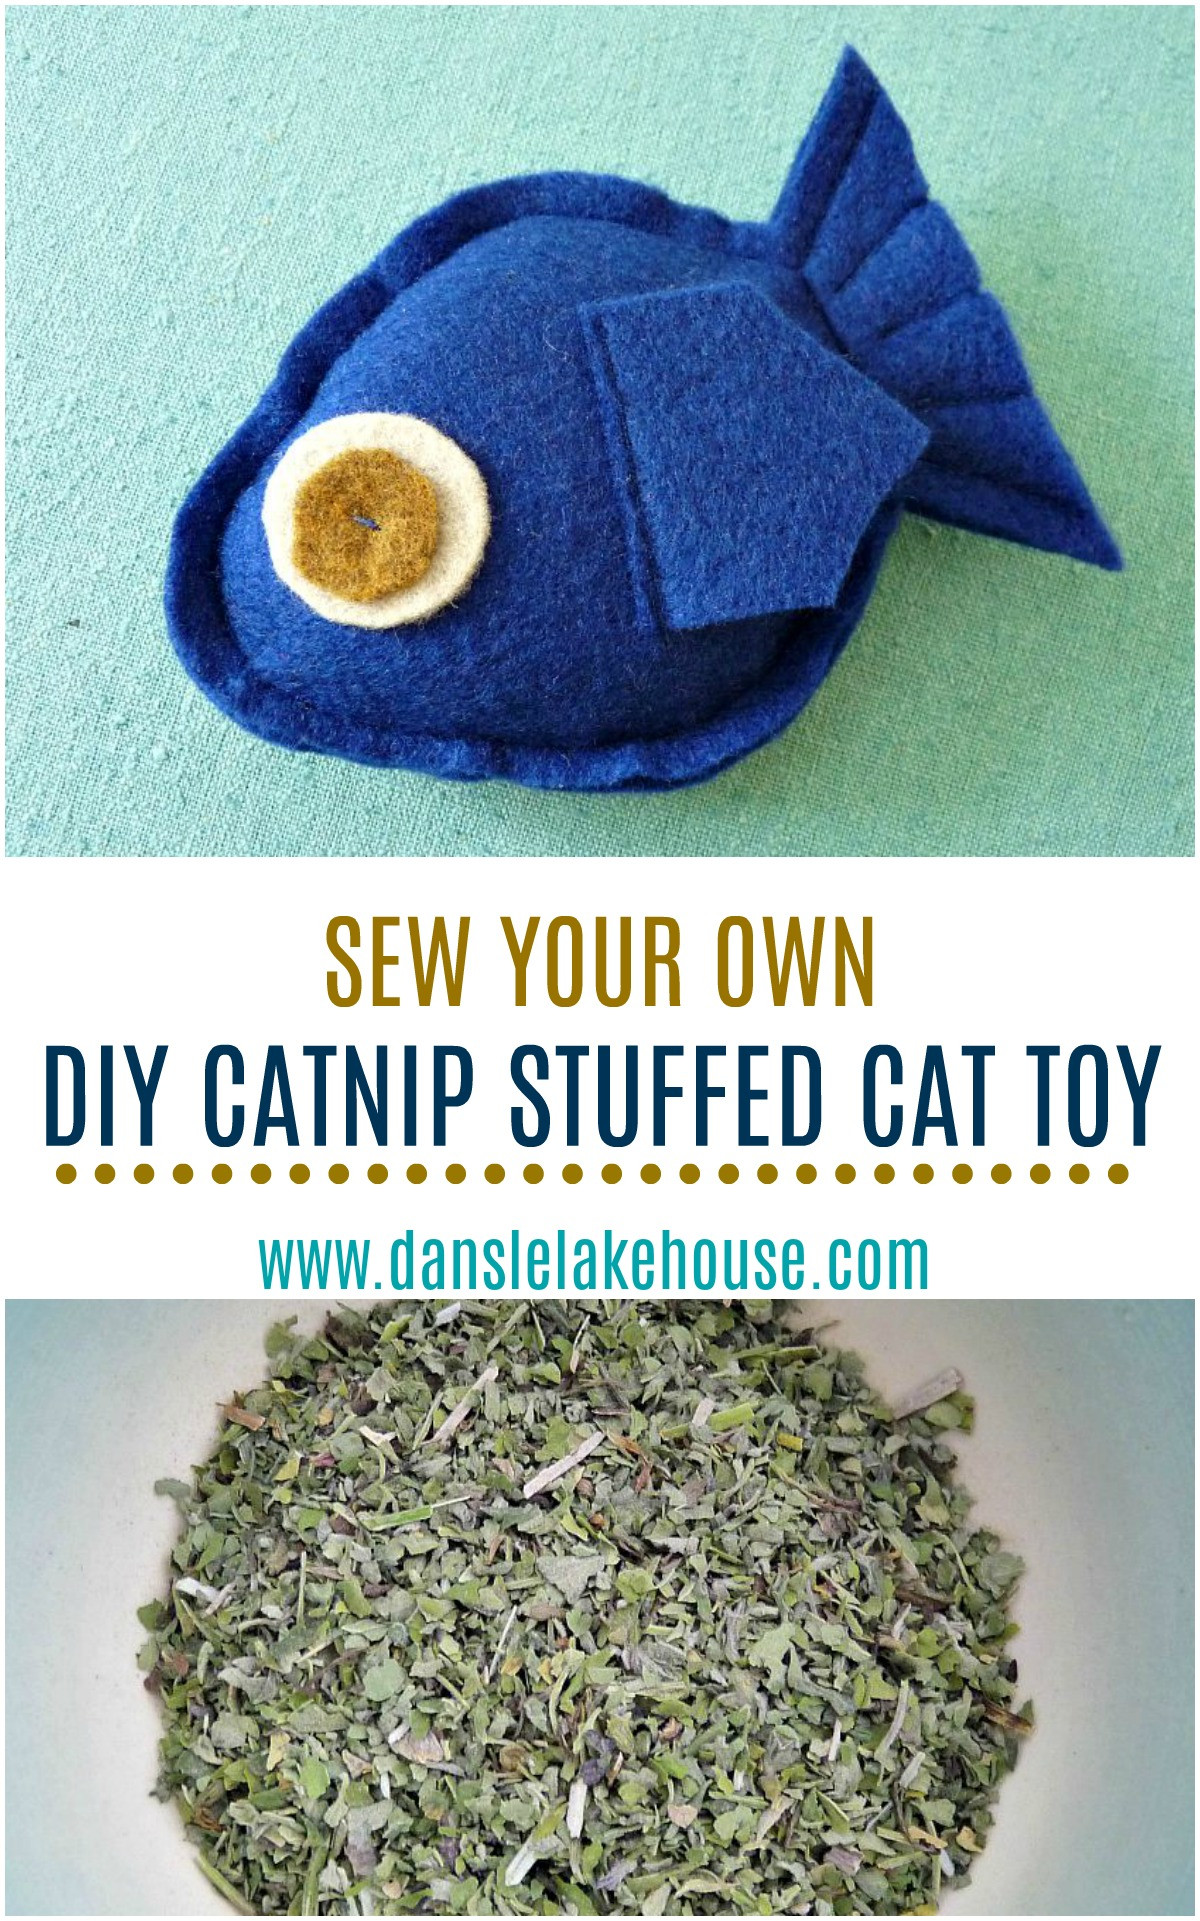
DIY Cat Toy Version Three – The Felt Fish Winner!
Finally, inspiration struck with felt. Realizing felt doesn’t fray, the need to turn the toy right side out could be eliminated entirely. This revelation led to the easiest and most adorable stuffed cat toy yet – a felt fish!
Supplies:
- Felt (Wool or Synthetic)
- Catnip (10-20 grams)
- Sewing machine
- Needle
- Thread
- Scissors
Steps:
- Felt Shapes: Two simple fish shapes were cut from felt. Circles were cut for eyes, and small fin shapes were also prepared.
- Eye and Fin Attachment: The felt circles for eyes were hand-sewn onto one fish piece. Fins were positioned and attached at the base using a sewing machine while the fish body was still in two separate pieces.
- Assembly and Stuffing: The two fish pieces were pinned together and sewn around the edges, leaving the tail open. The body was then filled with catnip, leaving the tail unstuffed for a floppy effect.
- Finishing Touches: The tail opening was sewn shut, and decorative stitching was added to the tail for visual appeal.
Success! The felt fish stuffed cat toy was a resounding success. It was quick, easy, and undeniably cute. The use of felt simplifies the process significantly, making it accessible even for beginners. If you don’t have a sewing machine, a simple blanket stitch around the edges works perfectly with felt. For added customization, consider using wool felt for needle felting designs or details onto your stuffed cat toy.
A Note on Catnip for Your Stuffed Cat Toy
Catnip is the magic ingredient that transforms a simple stuffed cat toy into an irresistible plaything. This herb contains nepetalactone, a compound that triggers euphoric responses in many cats. You can find catnip in various forms. Loose leaf catnip, ideal for stuffing toys, can often be found in tea shops or online retailers like Amazon.
When making your stuffed cat toy, the amount of catnip needed depends on the toy’s size. You can use pure catnip filling or mix it with batting to stretch your supply. Store-bought toys vary in their catnip content, with some boasting 100% catnip and others using a blend. Experiment to find the perfect catnip concentration to send your kitty into playful bliss!
Conclusion: Spoil Your Cat with a Homemade Stuffed Cat Toy
Creating a DIY stuffed cat toy is a rewarding experience for both you and your cat. It’s a simple yet thoughtful way to provide enrichment and entertainment. The felt fish design is a fantastic starting point, offering ease of construction and endless customization possibilities. So gather your supplies, unleash your creativity, and make a stuffed cat toy that your feline companion will cherish! Happy crafting!